
The Surge 2, in the same vein as other Souls-likes, is a very challenging title. While the game spares no expense in making you look and feel as badass as possible, pulling off all those sweet action-packed moments comes at the price of high difficulty. With volatile enemies at almost every corner and an unforgiving landscape where there is an ambush that awaits you, The Surge 2 can be a very tough nut to crack, especially if you’re going about its mechanics the wrong way.
For this guide for The Surge 2, we’re taking a look at a comprehensive list of all the best weapons, armor, and other gear found in the game. Take note that all of these items can be obtained after the Matriarch Celeste fight (check out a guide for that here) and before your final excursion into AID Command. As such, it’s important to note that some of these items are endgame gear, something to consider for the final stretch of the game and into New Game +.
These items are the best of the best when it comes to stat bonuses, damage, damage protection and a whole host of other benefits that fit all kinds of playstyles.
Best Armor Sets for The Surge 2
(All gear listed can be acquired after the Matriarch Celeste boss fight).
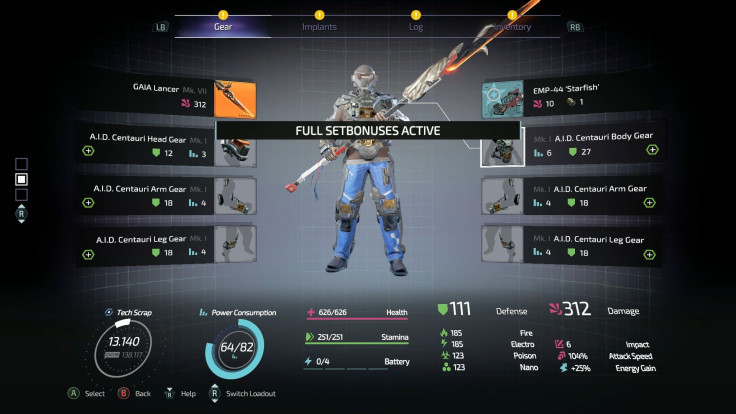
AID Centauri Set – arguably the best set in the entire game given that it’s useful against all situations. As an Operator Class set it’s noticeably weaker in terms of defense, but the Centauri more than makes up for it with powerful bonuses that benefit those who always play aggressively, as any good The Surge 2 player should.
- Partial set bonus – causes continuously channeled drone attacks to increase in damage the longer they are channeled. Not particularly useful for some playstyles, but good if you like using the GAIA drones from statues.
- Full set bonus – when striking an enemy with a melee attack, damage is increased for a short time. Subsequent attacks can stack this effect multiple times. The true power of the Centauri set lies in this bonus, as it encourages players to play aggressively and always come out on top due to the sheer amount of damage you deal. The effect works on cross combo hits, meaning that with faster weapons such as Double-Duty, Spears, or Twin-rigged and Punching Gloves you’ll always have the bonus fully stacked.
- Location – the first piece of the Centauri set can be acquired from Major General Ezra Shields (boss guide here) in AID Command should you manage to perform a finisher on him. The rest of the set can be bought from Dr. Sorensen once you return to Gateway Bravo.
- Recommended for – all enemies in the game thanks to its pure damage bonuses.
- Not recommended for – players who engage in a hit-and-run playstyle as well as dodge-hit-dodge mechanics.
Chrysalis Set – an Operator Class set that works wonders against large groups of enemies. The Chrysalis set provides decent elemental resistance against electro, poison and nano damage, but what makes it amazing are its bonuses for both partial and full set loadouts.
- Partial set bonus – Nano damage +20. Given that you will use nano weapons at almost all stages of the game, this bonus is incredibly powerful in adding a ton of damage to your overall output. What’s even better is that the additional nano damage affects all weapons, meaning that you can have as much as two elements in a single weapon.
- Full set bonus – killing enemies increases damage for a moderate duration. Subsequent kills can stack this effect multiple times. A damage-amplifying effect very similar to the Centauri’s, only this time it kicks in once you’ve killed someone. The effect lasts for longer though, which makes it better-suited for fighting groups of enemies rather than solo faceoffs.
- Location – the Chrysalis set can be acquired from most enemies after the fight with Ezra Shields. You’ll know if an enemy possesses Chrysalis armor if the limb is purple once you’ve locked in; afterwards, just perform a finisher as normal and you will gain the schematics for it.
- Recommended for – groups of enemies, especially those found in the Cathedral of the Spark and other later stages of the game.
- Not recommended for – solo battles like boss fights, as the full set bonus is wasted. The partial can still be useful, though, if you want to mix and match.
WRAITH Set – another Operator Class set, and the better version of the JAGUAR set found from the Hunters in Gideon’s Rock. The WRAITH set is perfect for those whose playstyles revolve around the continuous use of drones, especially those that require a large number of omni-cells.
- Partial set bonus – carry 10 additional Omni-cells. With the proper implants, you can easily raise that number further, giving you more shots on your drone.
- Full set bonus – filling a battery awards two Omni-cells. This bonus allows you to use your drones as long as you keep gaining batteries, which is incredibly useful. While you can get Omni-cells at many points in the game, having the WRAITH set means that you never have to worry about resting at a Med-Bay again in order to get more.
- Location – the first piece of the WRAITH set drops from Captain Cervantes (boss guide here) in Gideon’s Rock should you manage to perform a finisher on him. The rest can be bought from either Highball or Lowball, the bartenders in Cloud 9 Bar, after the boss fight.
- Recommended for – those who rely on drones in almost all fights, beginners, and boss fights that require long-ranged kiting like Ezra Shields.
- Not recommended for – those who rarely use Omni-cells and their drones.
SPARK Fanatic Set – a Sentinel Class set that boasts a solid amount of electro defense as well as bonuses that are beneficial to Staff, Hammer, and One-Handed users. The SPARK Fanatic is better in terms of defensive stats compared to an Operator Class set, but is still a pretty good option if you’re not too sure on what set could work best for you.
- Partial set bonus – when a battery is filled, damage is increased for a short time. While this bonus is not as reliable in terms of output compared to the Centauri set, it’s much better to have for those who play a much more defensive play style.
- Full set bonus – attacks that slam the ground produce an electrical explosion. Works best for large groups of enemies, as there are tons of weapons that have ground slam attacks in their combos. The easiest to perform is for the Staff, which has a ground slam as its second attack in one of its progression. The bonus works with any weapon regardless of element, and is great to use in tandem with the Starfish to constantly apply stuns on enemies.
- Location – the SPARK Fanatic set is dropped by spear-wielding acolytes in the Cathedral of the Spark.
- Recommended for – large groups of enemies, players who are not too aggressive in their playstyles.
- Not recommended for – solo fights, as the gimmick is only really useful if you’re being swarmed by multiple enemies.
ANGEL VI Set – a cool-looking set that’s very situational, but also incredibly powerful when used correctly. As a Goliath Class set it’s noticeably beefier in terms of defense, coming at a cost to stamina consumption. If you are in possession of any ‘Codename’ CREO weapons and are planning on using one for the rest of the game, then this is the perfect set to go with it.
- Partial set bonus – increases energy gain while wielding any ‘Codename’ CREO weapon. These weapons are found throughout the game, and they’re very hard to miss. The weapons themselves do not have any elemental damage, but boast high base damage as well as other great stats.
- Full set bonus – increases attack speed and impact while wielding any ‘Codename’ CREO weapon. These bonuses make the CREO weapons extremely viable in the right hands, with the additional impact providing a ton of utility against human enemies.
- Location – the ANGEL VI is sold by Molly Fox in Seaside Court and Highball or Lowball in Cloud 9 Bar. The set becomes available after the game’s major turning point in AID Command, and each vendor sells two schematics each.
- Recommended for – all enemies, as CREO weapons are flexible due to their lack of elemental bearing. Great against humanoid bosses due to the added attack speed and impact.
- Not recommended for – players who prefer elemental damage over raw damage.
PROTEUS Set – this is one of the rarer sets to have due to the fact that you only have one chance to actually complete it. If you do, you’re rewarded with the safest armor set that provides decent bonuses to your health, regeneration and healing, all worthwhile aspects once you get to the more unforgiving parts of the game.
- Partial set bonus – while health is low, regenerate health. Decent fallback bonus if you find yourself dying too much, especially to nanite-enhanced enemies that roam around in groups.
- Full set bonus – increases the health restored by healing injectables. Great for one-off clutch heals, but is quickly overshadowed once you fully upgrade your injectables. Still, having them fill your health more saves you on batteries, which you can then use on other bonuses as well as finishers.
- Location – the PROTEUS set can only be recovered during the fight with four androids in Jonah Guttenberg’s lab in CIT. You want to make sure that you perform a finisher on all of them, each in a different body part to acquire all of the schematics. That said, there’s a weaker version of this set called the Bloodied PROTEUS set, which can be acquired from the other roaming androids within CIT.
- Recommended for – players who want better healing, as well as those who find themselves healing too much in the later fights.
- Not recommended for – players who can’t sacrifice other bonuses for health-oriented ones.
GAIA Set – another drone-oriented set like the WRAITH, but this one offers more in terms of defense as well as good bonuses for those who use channeled drone attacks. The Goliath rating means its heavier, but if you think that that’s a good tradeoff for being beefier then this is a great alternative to the WRAITH and JAGUAR sets.
- Partial set bonus – increases damage of continuously channeled drone attacks. Great bonus if you’re already using the GAIA laser drone.
- Full set bonus – when a battery is filled, gain 10 Omni-Cell. This bonus is the best when it comes to Omni-cell replenishing ones, and you can easily refill your entire stock within a few hits with the proper weapon.
- Location – the GAIA set can be acquired from the GAIA statues in Gideon’s Rock. Highball, the bartender in Cloud 9 Bar, has a quest for a full set of this, and if you give it to him, he will reward you with a Codename CREO weapon. It’s a good trade, as you can easily craft the armor again afterwards.
- Recommended for – drone-heavy playstyles, players who prefer good defense that’s offered by Goliath armor.
- Not recommended for – players who want something that’s lighter but still drone-oriented. In this case, the WRAITH or JAGUAR set is better.
Nano Ward Set – an amazing Goliath Class armor set that’s perfect for players who have mastered the block and directional block. It also offers great protection against nanite-based attacks, of which many enemies rely on in the later stages of the game.
- Partial set bonus – reduces the stamina cost of blocking attacks. With The Surge 2’s combat highly-reliant on proper blocking and deflection, any bonus that allows you to perform these actions better are always welcomed. With this you also have a bigger failsafe when it comes to partially blocked directional attacks (yellow), allowing you to take more impact damage before staggering completely.
- Full set bonus – successfully directionally blocking an enemy attack triggers a nano explosion. This bonus is perfect for those always trying and succeeding in directionally blocking attacks, giving it an additional advantage over the counters and openings that naturally come with it. The nano explosion is great for constantly applying nano buildup, and as such try to always use this set in tandem with a powerful nanite-infused weapon.
- Location – the Nano Ward gear is found in four chests scattered around AID Command before the Ezra Shields boss fight. Here are the locations:
- Nano Ward Arm Gear – from the first scanner gate you deactivate, head towards the nearby AID encampment. The chest will be inside, and you’ll know you’re there if you encounter an audio log of Athena as she’s first encountered by AID.
- Nano Ward Leg Gear – the next one is hard to miss, as it’s on the way towards your goal. It’s at the top of the AID Entry Control Gateway, right after the second jammed door you open. It’s also marked by a magnetic lock above it which you can destroy with the Starfish in order to bring the next scanner gate offline.
- Nano Ward Body Gear – the next chest can be found at the top of Liang Wei Hospital, in a chest just below the one where you get the Force Hook. You have to navigate some stairs in order to find it, as the straightforward path is blocked by some grates.
- Nano Ward Head Gear – the last one requires you to go back to the Liang Wei Hospital observation room, where the AID scientists kept and observed the children they were experimenting on. There’s a small opening in a wall on the far side of the room, which is normally guarded by an AID soldier. Inside it you’ll see a locked gate, which you can open with the same keycard you use to open the room Warren enters at the top of the hospital. Entering the gate will lead you back outside to the street overlook, where a lone AID guard stands waiting. The chest lies in a corner facing the nearby exo-line.
- Recommended for – experienced players who use the directional block all the time against all possible enemies.
- Not recommended for – players who would rather dodge than block.
Honorable Mentions
The LYNX set which I briefly detail here, as well as the VULTR and Scavenger sets are decent options to have. That said, I would mark them as mid-tier sets rather than the endgame-tier, as most of their bonuses pale in comparison to those offered by the above.
Sets like the SCARAB and Liquidator sets are also good to have if you’re looking for damage protection, but they’re also overshadowed if you play well enough to avoid getting hit all the time.
Stay tuned for more guides on The Surge 2. The game is now available for PC, PlayStation 4 and Xbox One. Check out my review for The Surge 2 here. You can also check out other The Surge 2 guides below:
- Beginner’s Guide
- Warden Garcia Boss Guide
- Best Starting Weapons and Armor
- URBN Gear Set and URBN Judgement Axe Location
- Little Johnny Boss Guide
- Brother Eli Boss Guide
- Lost Seed Locations In Gideon's Park
- Captain Cervantes Boss Guide
- Delver Boss Guide
- Major General Ezra Shields Boss Guide
- Resurrected Brother Eli Boss Guide
- Exceptional combat mechanics.
- Well-implemented RPG system.
- Interesting level design, dense and filled with secrets and hidden routes.
- Good difficulty curve, extremely tough at times but completely fair.
- Improved storyline, with much more interesting characters.
- Fair bit of replay value.
- Great art, enemy and world design.
- Forgettable music.
- Some technical issues like animation jank and visual bugs.
- Constant backtracking may prove to be tedious to some people.


