The hardest fights in The Surge 2 are found with bosses, all standing in your way of the eventual truth that haunts Jericho City. For this guide, we’re taking a look at one of the two main bosses of Port Nixon, and easily one of the most intimidating: Little Johnny. But while his appearance may be terrifying as an overweight drug addict inside a gigantic mechanical tripod creature, he’s very easy to defeat so long as you keep your patience and wits about you while fighting him.
Location and preface
Little Johnny can be found at the very end of Port Nixon. After being tasked by his brother, Brother Eli, to end his drug operation of Blue Sparkle once and for all, you make your way to this industrial wasteland. It’s also where the plane happened to crash, and Athena’s instructions back at JCPD specified that you make your way to this industrial part of the city.
Little Johnny is a good warmup for proper movement and placement in fights and skirmishes. He is quite large, mainly attacking with the tripod’s three legs, a set of mandibles, and acidic projectiles. He also becomes more dangerous as the fight goes on, as he cannot be beaten through conventional means. While he can be a nightmare to deal with in the context of the limited space you fight him in, Little Johnny is quite predictable in that you’ll almost always know what his next move is, allowing you to anticipate him accordingly.
Preparation
By this point in the game, you should have already gotten your RIG some upgrades through core power levels and proper armor. If you want a good list of early game armor and weapons, check out my guide for it here. That said, you can also get the second of Athena’s gift weapons in the ship graveyard part of Port Nixon, where Athena was discovered by both AID soldiers and members of the Children of the Spark when the plane crashed two months ago.
This weapon is called the Vibrating Quickscythe, and it’s a nanite-infused staff capable of dealing powerful damage through fast attacks and high elemental potency. You can’t really miss this weapon, as your route through Port Nixon will place you directly in its path. It’s the best weapon to use against Little Johnny thanks to its long reach and reliable cross combos in comparison to Spears; whereas the latter relies on thrusts, the Staff uses swings in order to deliver most of its damage.
You’ll know that you’re about to face Little Johnny as soon as you come across a room where there is a one-way jump. At a corner is a Twin-rigged enemy, and on another side of the room is a locked door and a path hidden by destructible boxes. Follow the path to see a self-detonating spider, and just head straight until you see a door. This one will lead you to the room with a magnetic lift, and the next door leads to the Med-Bay. You’ve now unlocked the shortcut for this boss fight, allowing you to bypass a ton of enemies on the way.
In addition to unlocking shortcuts, make sure that your weapons and armor are upgraded to your liking, as well as the implants for your RIG. This is a good time to make sure your primary health injectable is also fully upgraded for more healing charges, and you can also repeatedly kill that one enemy near the boss room in order to fully charge it.
Once you’re fully armed and ready, jump down from the room to find yourself on a wide platform. A short cutscene will play showing Little Johnny brutally rampaging through some of his men.
Aim for the limbs
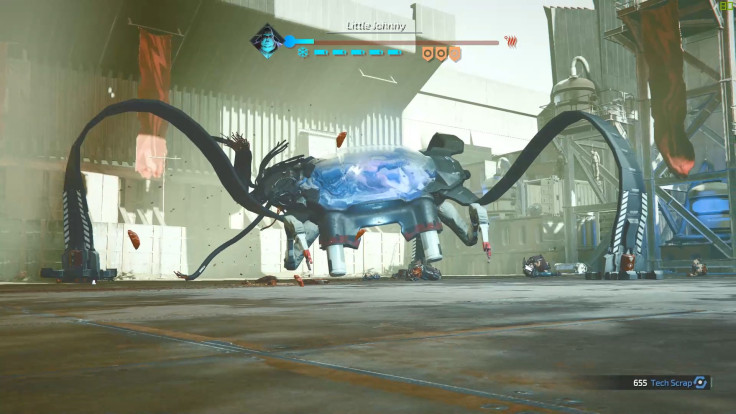
The first thing you’ll notice about Little Johnny is that he is anything but. The tripod bot he is in is pretty huge, covering up nearly a fourth of the platform you’re on. It has three legs, each of which hold a cooling unit. There are two more cooling units near his mandibles at the front, and all five of them are integral in keeping the mech up and running. To defeat Johnny, you must cause the mech to overheat by destroying all cooling units, boiling him alive inside the cockpit.
For an easier time, start with the limbs first, preferably the one in the back. The reasoning for this is that the back limb has a special attack that’s a bit different from the two in the front, making it much more dangerous. Destroying this limb first will give you more leeway with the other limbs. That said, you can always go with any of the limbs first, so long as it’s the legs.
Keep a respectable distance from the legs whenever you’re fighting him. He has two basic attacks for all the legs: a quick stomp, which will easily floor you, and the somersault forward. The latter sees him balancing on the leg you’re hitting to propel himself forward in a somersault, and he will always land back on the limb that you are attacking in an effort to stomp you. Avoiding it is very easy, and you always need to dodge just before the leg hits the ground.
Unlike every other enemy in the game, Little Johnny feels a bit more responsive to play if you apply the dodge-hit-dodge tactic. You want to weave in and out under him, always taking care to look at the orientation of his legs so as to avoid any quick stomps or somersaults. If you place yourself slightly in front of him, he may attack you with a hooking attack using his limbs. If you’re in front of him entirely, he will rush you with several frontal attacks that can be directionally blocked. The best position is his sides and back, where the only attack he can make are those stomps.
Besides stomping, the back leg can do one more special attack, as well as provoke a direct attack from Johnny’s cockpit. He can immediately whip around the back leg from left to right, which can be dodged by evading backwards. If he suddenly stops in his tracks as you’re attacking the back leg, he will most likely bend the cockpit towards the back and attack you with his mandibles; watch out for this, as it can easily destabilize you.
In addition to these limb and frontal attacks, Little Johnny can also bring down his cockpit on you from above if you find yourself underneath him. Never stay under him for too long, and instead try to always skirt to his sides and back.
After destroying a limb, it will start to exhaust poisonous gas, which can build up over time if you’re not careful. This is the reason why Little Johnny gets more dangerous over time, as each destroyed limb starts to become a hazard just by standing next to it.
Once you’ve destroyed all three legs, you can start focusing on the two cooling units near the mandibles. As with the legs, you want to be on either side of Little Johnny rather than the front, as here he can only perform easy to dodge attacks. However, once all the legs have been destroyed, he also starts leaking noxious gas from the cockpit itself, meaning that you have to keep your attacks quick so as to not stay in it for too long.
In most cases, Little Johnny will also switch between two attacks as you start to destroy the cooling units near the mandibles: the basic quick stomp, and the cockpit stomp. Once he raises his body up to the air, expect him to come down hard, and if you get hit by it you also get infected with the poison from the noxious gas.
Venting toxic materials and coolant filled with electrical traps
At any point after you’ve destroyed one or two limbs, Little Johnny will start to perform two special moves. The first is a noxious vomit attack, which he sprays from left to right. It has a pretty huge windup, and for the most part you want to sprint behind him as soon as he goes to spray it.
The second one is much more dangerous, and can easily kill you if your positioning is wrong. Little Johnny raises his cockpit as far up as he can to vent his coolant, bringing down fluids from above. While the fluid itself isn’t damaging or in any way dangerous, it carries small electrical traps that deal a small amount of damage and apply electricity build-up. Once the electricity build-up has been filled, you will get stunned for a short while, slowing your movement to a crawl and preventing you from attacking, dodging, or sprinting away. These traps cannot be destroyed unless they are tripped, and the only way to trip them without it dealing damage is to constantly sprint.
Evading these traps may seem a bit impossible at times, but there is a way to minimize the chances of you stepping on them. First, you will notice that the traps move in a certain way. They will move in a line from the center where Johnny discharges the coolant. However, as they extend, they will begin to form arcs, and by the time they reach a certain point, they will have made a circle around you, trapping you with Johnny inside.
It’s important to remember that the space inside this circle is not too bad, and there’s ample room to move and dodge effectively. As such, do not try and move out of the circle once you’re in. Moving out, you can’t tell the boundaries of where these traps are, making it ten times harder to avoid. However, if you’re inside the circle they make, you can always get a feel of when you’re about to hit the edge, and you can then move forward to avoid them.
These traps last for a pretty long time, but if you’re watching where you step, you shouldn’t have any trouble avoiding them. I’ve made the mistake of trying to outrun them, and what usually happens is that Little Johnny starts to vent again, leading to more traps existing and scattered about unevenly. Compare it to if you’re just staying within the circle they make and you can still damage Johnny while his traps pose no threat to you.
Other helpful tips to remember
- You can try to directionally block some of his frontal attacks for possible punishment, although that works best if you’re going to go for the cooling units on the mandibles first.
- The Quickscythe’s nanite buildup and subsequent explosion deals a ton of damage to his limbs, so be sure to keep the pressure constantly in order to trigger more explosions.
- After his somersault attack, he will usually follow it up with a quick stomp. Always be on your toes to dodge through these telegraphed stomps.
- Using Twin-rigged weapons here is a bad idea, as you can’t rely on either the weapon’s short range or its attack speed due to the reactive nature of Johnny’s stomps. Always kit accordingly.
Aftermath
After seeing Johnny boil alive and eventually blow up inside that overheated cockpit, you will be granted the EMP-44 Starfish, an attachment for your drone that allows you to open electronically-sealed doors, magnetic lifts and other electronic locks. It’s also the most useful drone attachment for combat, given that it applies a huge amount of electrical buildup to enemies in an explosion. With this now in your arsenal, you can uncover many more secrets in Jericho City, as well as open up new pathways to explore.
You will also get Little Johnny’s Forceps, a set of powerful Punching Gloves, as well as a load of tech scrap. Before you leave the platform, try out the Starfish attachment on the container vans in the four corners. All of them have tech scrap as loot, as well as an audio log detailing Little Johnny’s descent into madness.
You can now head out, following the pathway until you come across the magnetic lift that’s in the room before the Little Johnny fight. Remember the locked door here near the path back to the Med-Bay? You can now unlock it with the Starfish to find an audio log detailing what happened to April, the girlfriend of Rex, one of the vendors in Seaside Court. Make your way back there to return the audio log to him to advance his storyline.
Of course, returning is not as easy as it seems, as Little Johnny’s death has now caused Brother Eli’s plans to go into motion, one that will be revealed to you before you leave Port Nixon.
Stay tuned for more guides on The Surge 2. The game is now available for PC, PlayStation 4 and Xbox One. Check out my review for The Surge 2 here. You can also check out other The Surge 2 guides below:
- Exceptional combat mechanics.
- Well-implemented RPG system.
- Interesting level design, dense and filled with secrets and hidden routes.
- Good difficulty curve, extremely tough at times but completely fair.
- Improved storyline, with much more interesting characters.
- Fair bit of replay value.
- Great art, enemy and world design.
- Forgettable music.
- Some technical issues like animation jank and visual bugs.
- Constant backtracking may prove to be tedious to some people.


