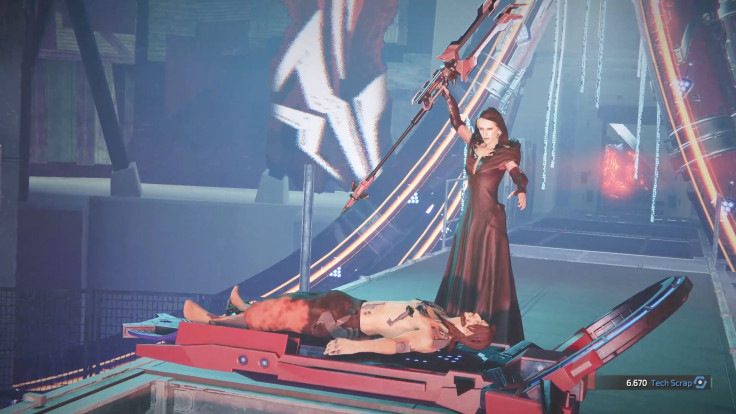
The hardest fights in The Surge 2 are found with bosses, all standing in your way of the eventual truth that haunts Jericho City. For this guide, we’re taking a look at the famed Matriarch Celeste, the leader of the Children of the Spark and mother to Little Johnny and Brother Eli, arguably two of the worst sons in video game history. You’d be surprised to learn, however, that the Matriarch is somewhat easier to fight compared to Eli, despite sporting two distinct phases. That said, she’s still very dangerous, made especially more so because of her electrical-based attacks.
Location and preface
Matriarch Celeste is the boss waiting for you at the Inner Sanctum of the Cathedral of the Spark. Following Jonah Guttenberg’s directions to get the Spark to successfully conquer the nanite swarm, you journey through Port Nixon and into the lair of the enemy itself. The Cathedral is built like a fortress, with tons of electrical weapon-wielding acolytes ready to swarm you in an instant. Prepare to take on some of the most annoying enemies in the entire game here, as you’ll constantly find yourself stunned if you get hit by their brutal attacks.
Matriarch Celeste, while incredibly augmented, is still human and shares the same weaknesses (except for electricity) as many other humans. She’s also susceptible to proper directional blocks, as both her forms rely on melee attacks that can be deflected with the proper timing. Treat this fight like you did all the other human bosses – that is, to play aggressively and counter whenever possible, so as to keep her attacks at bay and minimize her damage output. Her two phases are slightly different from one another, but both work on the same principles.
Preparation
Matriarch Celeste is found in the central dome of the Cathedral, at the very ground floor. You’ll first find yourself at the peak of the dome, making your way down. Before the fight begins, you can view a cutscene of her reviving Brother Eli for a second time, setting up a third rematch with him in the near future. He then takes the Spark with him, leaving Matriarch Celeste to deal with you.
You’ll want to equip your best gear here and now, as the fight ahead can be brutal. For the most part, anything that provides a substantial boost to elemental resistance is great, but you can also trade that off for sets that give additional bonuses for aggressive play, like the LYNX set I discussed here as well as its other contemporaries. The Nano Ward set found in AID Command is particularly strong as well (check out a guide on how to acquire it here), given that you can deflect most of her incoming attacks. Likewise, if you’ve got a nano-infused weapon, consider the Chrysalis set, as its partial bonus gives you an additional +20 nano damage.
Matriarch Celeste is particularly susceptible to both nano and fire damage, and as such you want to capitalize on this by wielding nano- and fire-infused weapons. Take your pick from the many nanite weapons given to you by Athena from her visions, or get either the INF-Labs Vechni (bought from Dr. Sorensen in Gateway Bravo after her questline) or the SERU Biomaster (check out a guide for getting it here) if you prefer fire weapons. Avoid using electrical-based weapons, as these don’t really do anything against her since most Children of the Spark members are resistant to electrical damage.
The rifle or flame-channeled drones (acquired from statue enemies at Gideon’s Rock) can work wonders here, and it’s up to you which one you prefer. The Starfish, while useless in stunning her outright, can still be used for staggering her at times. If you don’t have a steady source of omni-cells (Jaguar or Wraith sets) then you can switch to the Starfish after you’ve used up all of your omni-cells, even for just the brief stagger that comes with it.
The most important thing to note before starting the fight is that nano-infused weapons work the best here, especially thanks to their high damage output once the build-up reaches its peak. You do not want to drag this fight out, especially in the second phase, as Matriarch Celeste has a very powerful kit during this time.
First phase
The fight begins once you drop onto the lowermost platform of the Cathedral. Matriarch Celeste will always start off by attacking you from across the room, flying as she does so. Think of her during this time as a witch riding her broom, swooping in from above to attack you. This attack can be blocked or dodged, but it’s always better to deflect it for a good opening.
Her move set during the first phase is fairly easy to remember, as it’s only comprised of four kinds of attacks:
- Spinning swing from the right (R) – the easiest to block due to how telegraphed it is. Matriarch Celeste will spin around to deliver a sweeping slash to your right side, and you can easily block it for a perfect deflection before it hits you.
- Charged slash from below into overhead slam (B-T) – a two-hit progression that delivers solid electrical damage, with delayed timings as well. The charge can be a bit harder to time, but with enough observation and practice you’ll easily learn how to deflect it. The overhead slam deals area-of-effect damage, and as such if you aren’t planning on blocking it, make a wide berth in order to avoid the fringes.
- Boomerang weapon throw – cannot be blocked and will not register on your radar, even with the directional block analyzer. Matriarch Celeste will do a little spin and throw her weapon in front of her, with the weapon returning from the same trajectory a short time after. You dodge this twice: the first is for the initial throw, the second before it hits you from behind. Always dodge to the sides rather than backwards.
- Swooping thrust into overhead strike (T-T) – an upgraded form of her initial swooping attack, but this time around it has a follow-up. After she hits you, she’ll pause, only to deliver an overhead attack that also deals area-of-effect damage. You can directionally block both hits to counter with your own, but keep track of its delayed hit in order to properly time it.
During this phase of the fight, Matriarch Celeste also has a habit of cancelling her attacks, which is really handy for you. You can take advantage of this by allowing her to dodge away and resetting the overall flow, or maybe take the time to heal up and catch a breather. She doesn’t follow-up these attack cancels with anything meaningful, and as such you’re more likely to benefit from them compared to her.
The best thing you can do here is to control the pace of the fight, making her play defensively and having her cancel most of her attacks. If you managed to do that, then this phase becomes a whole lot easier. If you’re also equipped with a nano or fire weapon, make sure to keep applying buildup for more damage and to make this first phase shorter.
Final phase
After you’ve managed to get her low enough, Matriarch Celeste will explode in a burst of energy to reveal her true form, sporting two additional robotic arms similar to the AID robots. She will also start to wield her Double-Duty weapon in its faster, double form. Her attacks here are more relentless and dangerous, but almost all of them can be easily blocked with properly timed deflections.
The most important thing to remember here is to stay fairly close to her at all times, as you want to be ready for when she charges up a powerful attack. You’ll know when this is about to happen as she starts to curl up; once she does, start attacking her to pull her out of this state.
If she manages to charge up, she will explode in a beam of energy outwards, dealing a chunk of damage and impact. She will also follow it up with a horizontal shockwave very much like that of Eli’s (a boss guide for him can be found here) that you can dodge by moving to the side. During this time, her attacks will also deal more damage, and some of the room’s parts will be electrically charged, dealing damage and electrical build-up. You do not want her to be in this state perpetually, and as such you always want to be near her to snap her out of potential charges.
Her move set during this phase is a little more varied, but almost all of them are just side slashes from her metal arms with very similar timings. The most common is her charged attack from under into an overhead slash, which is fairly easy to time as well. Try and always face her from the front, as she can now also attack from the back with faster thrusts from her metal arms.
During this phase, she also gains a grab attack, which you must avoid at all costs. The window for dodging it is pretty big, but you want to put at least two or three dodges’ worth of space between you just to make sure it doesn’t hit you. Matriarch Celeste will extend her metal arms forward like she’s leaning in for a hug, and afterwards pull everything inside the space towards her. While the grab itself isn’t very damaging, the follow-ups to this can be pretty devastating, which is why you should do your best to not get roped in by it.
Try and keep the constant pace of attacks up, only dodging whenever she tries to grab you or if you’re not sure you can properly deflect an attack. If you get her low enough, go for a finisher to finally eliminate Matriarch Celeste once and for all.
Other helpful tips to remember
- Matriarch Celeste is fairly easy compared to other endgame bosses, and she only starts to pose a real danger if you let her charge up in the final phase. Try and take advantage of her wide openings on her fairly limited move sets and keep the harassment up in order to take full control of the fight.
- If she manages to charge up in the final phase, keep to the middle of the room after you dodge the two shockwave attacks. Fighting her here is easier than at the sides, as you can hardly tell if a strip of the room will get electrically-charged or not.
- A good chunk of her damage comes from attacks that start from afar, and you can easily nullify this threat by keeping close to her.
Aftermath
Eliminating Matriarch Celeste will reward you with the Icon of the Spark, her unique, electrically-enhanced Double-Duty weapon. The Icon is a top-tier weapon capable of dishing phenomenal amounts of damage with some great stuns in between, and if you can properly do cross-combos with it you can use this weapon for all of the remaining bosses in the game.
You can now leave the Cathedral for good to follow Eli’s path, which unfortunately leads back to the CREO Institute of Technology. The way forward will be brutal, beginning from the Underground as you make your way back again to the facility. There are also some surprise horrors that await you there, but the end of your journey also draws near, as Eli’s plans come to fruition and the true nature of the nanite swarm starts to fully reveal itself.
Stay tuned for more guides on The Surge 2. The game is now available for PC, PlayStation 4 and Xbox One. Check out my review for The Surge 2 here. You can also check out other The Surge 2 guides below:
- Beginner’s Guide
- Warden Garcia Boss Guide
- Best Starting Weapons and Armor
- URBN Gear Set and URBN Judgement Axe Location
- Little Johnny Boss Guide
- Brother Eli Boss Guide
- Lost Seed Locations In Gideon's Park
- Captain Cervantes Boss Guide
- Delver Boss Guide
- Major General Ezra Shields Boss Guide
- Resurrected Brother Eli Boss Guide
- Exceptional combat mechanics.
- Well-implemented RPG system.
- Interesting level design, dense and filled with secrets and hidden routes.
- Good difficulty curve, extremely tough at times but completely fair.
- Improved storyline, with much more interesting characters.
- Fair bit of replay value.
- Great art, enemy and world design.
- Forgettable music.
- Some technical issues like animation jank and visual bugs.
- Constant backtracking may prove to be tedious to some people.


