The hardest fights in The Surge 2 are found with bosses, all standing in your way of the eventual truth that haunts Jericho City. For this guide, we’re taking a look at the boss of one of the game’s major turning points, Major General Ezra Shields. Shields is one of the major figureheads of the AID group within Jericho City. Shields has two distinct phases that require two very different strategies, forcing you to adapt wisely to his move sets. Beating him also marks the start of the game’s third act, and changes the map significantly; it’s recommended to make sure that you’ve finished all of your desired side quests before moving on, as they may be harder to finish later.
Location and preface
Major Ezra Shields is found in AID Command, the heart of AID operations within Jericho City. After dealing with the Delver in Gideon’s Rock and conversing with Jonah Guttenberg, you begin your journey towards AID Command, where Shields and AID are keeping Athena and several other children hostage under the pretense of a rescue and evacuation. Before you reach AID Command itself, however, you find yourself in Gateway Bravo, a safe bastion at the edge of the city, where you meet up once again with Benjamin Burke and other survivors.
AID Command itself is a vicious and unforgiving area, filled with tons of high-level enemies that pose a threat greater than any you’ve experienced thus far. At the very end of it is Major General Shields, who is all that stands between you and Athena. The fight itself is quite symbolic, as the location is Project Utopia’s crash site; Project Utopia is the nanite rocket from The Surge, which collided with the plane that was carrying you and Athena, setting off the chain of events for The Surge 2.
The fight is a bit different from everything else you’ve faced thus far, mostly because of how Shields’ two phases are very unique from each other. In his first form, Shields rides a mech called Metal Armor, which is pretty tanky and requires no limb cutting or deflections whatsoever. The second one is much like every humanoid boss you’ve come across, but there are several factors which may affect its overall difficulty.
Preparation
By this point in the game, you should already be well-kitted, with at least Mark IV or V weapon and armor plus a core level of at least 50, with some good implants to go with it. A rifle or sniper drone will do wonders here, especially in the first phase against Metal Armor. It should be noted that if you don’t have the Wraith or Jaguar set crafted (found from the Hunters in Gideon’s Rock and Molly’s Store in Seaside Court after beating Cervantes) you can still get additional omni-cells in the various boxes scattered around the level during the fight.
When it comes to weapons, you will want a nanite-infused one during the first phase and either a fire or nanite one during the second. The best one that fits both criteria is Helix of the Delver, which you acquire after beating the Delver (you can check out a guide for beating it here) in Gideon’s Rock. Likewise, you will also get two nanite-infused weapons from Athena’s visions in the leadup before the fight:
- Fractal Reaver – a powerful and impact-heavy nanite-infused Single-rigged weapon. While not exactly a good choice for the first phase of the fight due to the weapon’s heavy nature, it can work wonders for the second one if you can land perfect blocks as much as possible. Otherwise, I’d skip this in favor of something faster, like the second weapon.
- Twitching Riptalons – punching gloves with particularly high attack speed and nano damage, coming at the cost of a shorter range. This is the safer of the two for both stages of the fight due to the fact that it can be effective against both Metal Armor and Shields himself, so long as you can deal with the range for it.
There’s no need to search for the weapons as the visions will be in your way as you head towards the crash site. That said, I still recommend something like Helix of the Delver or even Darkened Dragoon instead, as those come with both speed and reach at the cost of some impact. In the end, it’s all up to you, but always try to opt for nanite weapons if possible.
The shortcut is relatively straightforward. From the Med-Bay in AID Command, head up to the top of the building towards the magnetic lift. From there, use your Hook to slide down towards the crash site, where two AID guards are waiting. Behind them is the door leading to the boss fight, which is activated by your Starfish drone. If you need battery charges, these two can also be a good source of them before the fight.
The fight leading to Shields is a major turning point in the game. Once you beat him, there is no turning back as the map will change significantly, bringing with it a host of new and more dangerous enemies. Make sure you’ve prepared enough for the coming third act, finishing all of the side quests that you may have missed and keeping your gear in top form.
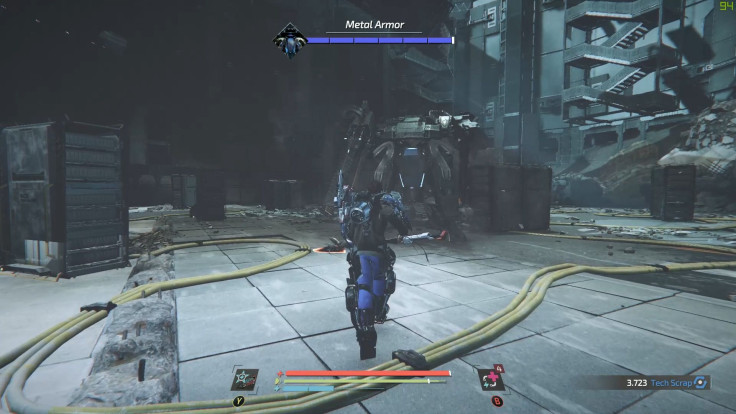
First Phase – Metal Armor
The first phase is comparatively easier if you’re coming from a Souls background. This is because you will face Shields in a mech, which is incredibly slow. From here, he will mostly rely on two forms of ranged attacks to harass you, with two more special attacks if you get too close for comfort. The only way to deal damage is by attacking either of the mech’s legs with melee attacks or using your drone to deal damage to his gun and flamethrower.
Once the fight begins, make sure to keep a relatively safe distance from Shields, hitting him with one or two attacks as you strafe around him. The key thing to remember here is that his options for dealing with your melee attacks are limited only to direct kicks from the front, which are unblockable and will knock you back a considerable distance. Besides that, he can use his flamethrower to throw down exploding napalm around him, which has a decent range to it. You will know when this one’s about to be up if the ground beneath him starts spewing flames. He can also use his gun to spin it around him rapidly and deliver gunfire from above, which hits anything near his legs.
Keep harassing his legs and avoiding attacks in melee range. At times, when his gun and flamethrower are fully loaded, he will deal two types of ranged attacks: the first is a straight line of fire from his flamethrower, which is incredibly wonky to deal with. Usually you want to get near him as soon as possible to avoid dodging through it too much, but be careful not to get too close as the hitboxes can really mess up and detect that it somehow hit you.
The second one is just continuous gunfire from the gun arm, which is really his most effective way of dealing direct damage to you. If you see him slowly starting up the gun while he’s in an upright position, move away from his line of sight by heading near his feet or hiding behind several boxes scattered across the room. These boxes are great for cover during these attacks, but the flamethrower can pass through them at times, so be sure to keep that in mind.
The two ranged attacks are very reliant on him fully charging them up, and you can easily try and halt the loading sequence by attacking with a drone. The Jaguar and Wraith sets do wonders here, as you can easily make sure that he doesn’t bring his ranged attacks to the table too much. In between, make sure to keep the pressure on his legs as much as possible, and after running down the blue health bar you will finally face Ezra Shields himself.
Final phase – Major General Ezra Shields
Fighting Shields is very similar to the fight against both Captain Cervantes and Warden Garcia, in that they are harder and tougher human enemies with some special move sets. Shields wields a set of punching gloves which deliver a ton of impact damage. One hit is enough to stagger you and open you up for a relentless beating.
In addition to this, you will also need to contend with the disabled Metal Armor, which will continually shoot flame projectiles, flame lasers, or force projectiles at your position throughout the fight. However, you can actually use these attacks to your advantage, as Shields himself can be hit and damaged by them. Using this knowledge, you can constantly lead Shields to where these attacks will land, with the flame ones delivering a ton of fire and impact damage.
The most important thing here is to keep your lock-on trained on Shields throughout the fight, while you constantly listen to the Metal Armor in the background. There are some very helpful audio cues as to when the mech will launch projectiles, and you want to make sure that you dodge away from the attacks before they impact and while Shields is near you; if done correctly, you’ve just taken a significant chunk off of Shields' health while also applying fire build-up, which you can take advantage of if you’re also using a fire weapon.
Almost all of Shields' attacks can be deflected for massive openings, with only one being unblockable. Once he charges from afar, he will then do his jumping attack, which has an area of effect to it. Make sure that you’re not within range or stagger and receive some damage, as well as opening you up to his combos.
Play the countering game for most of the fight, and let the mech do most of the work in delivering damage. The area you fight in is quite large, and as such you can easily lead him around in a circle with the Metal Armor somewhere in the middle. Once his health is low enough, deliver a finisher to finally eliminate him and move the story forward.
Other helpful tips to remember
- Instead of sticking to one direction when kiting him during the Metal Armor phase, mix it up every once in a while, from clockwise to counterclockwise and vice versa. The reason for this is that he will tend to move away from the middle part of the stage and towards the sides. Circling the other way will balance that. You do not want him at the sides of the stage, as you can’t circle him there and he will make your life very difficult.
- Playing patiently pays off during the final phase, as you can constantly rely on the Metal Armor dealing damage to Shields given the proper timing and position. This is the safer route in contrast to blocking, as his attacks can really stagger hard.
- Make use of the omni-cells scattered around the area if you’re not wearing Jaguar or Wraith armor, as those will staunch his ranged attacks in the Metal Armor phase.
Aftermath
If you managed to do a finisher on either of his arms, you will be rewarded with the General’s ACU, Shields’ personal set of punching gloves. It’s one of the most impact-heavy punching gloves, which makes it incredibly useful against fast-hitting enemies. You will also get a schematic for the AID Centauri arm part, or any other part depending on which limb you cut off. Building towards this set is highly recommended, as it’s easily one of the most powerful available in the game.
A short cutscene will also play out here, showing Athena getting disintegrated in her chamber as Shields’ plans come to fruition. In an effort to save humanity, he and other AID scientists tried to merge her with the nanite cloud, hoping to appease the Rogue Process by giving it humanity. Whether or not the plan works to their liking is something you will find out later, but for now one thing’s certain: Athena has transcended, and Jericho City is at her mercy.
The debris from the destruction of the chamber and subsequent integration of the nanite cloud has also driven you deep underground. Here, you will face harder monstrosities in your quest to return up top, but what awaits you there may not be as pleasant as you think.
Stay tuned for more guides on The Surge 2. The game is now available for PC, PlayStation 4 and Xbox One. Check out my review for The Surge 2 here. You can also check out other The Surge 2 guides below:
- Beginner’s Guide
- Warden Garcia Boss Guide
- Best Starting Weapons and Armor
- URBN Gear Set and URBN Judgement Axe Location
- Little Johnny Boss Guide
- Brother Eli Boss Guide
- Lost Seed Locations In Gideon's Park
- Captain Cervantes Boss Guide
- Delver Boss Guide
- Exceptional combat mechanics.
- Well-implemented RPG system.
- Interesting level design, dense and filled with secrets and hidden routes.
- Good difficulty curve, extremely tough at times but completely fair.
- Improved storyline, with much more interesting characters.
- Fair bit of replay value.
- Great art, enemy and world design.
- Forgettable music.
- Some technical issues like animation jank and visual bugs.
- Constant backtracking may prove to be tedious to some people.


