The hardest fights in The Surge 2 are found with bosses, all standing in your way of the eventual truth that haunts Jericho City. For this guide, we’re taking a look at HAROLD, a tragic victim to Eli’s malicious plans. Starting off as Guttenberg’s reliable AI assistant, HAROLD becomes infected with a virus meant to wear down the defenses of the AID. Now sporting a reinforced body of an AID robotic tracker unit (those three-legged robodogs you face in AID Command), HAROLD turns against you to stop you from leaving the CREO Institute of Technology altogether. In terms of difficulty, HAROLD’S fight is dependent on how you fared with the AID robotic tracker units in the earlier stages of the game.
Location and preface
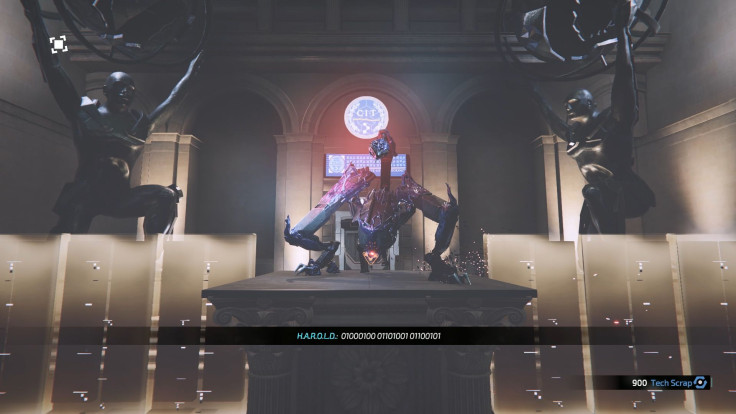
HAROLD is located in the lobby of the CIT, much like the second Brother Eli boss fight. After beating Matriarch Celeste, you head back to the CIT, facing its robotic security along the way as HAROLD’s systems have been compromised. You arrive to find out that Eli has already murdered Jonah Guttenberg, taking the secrets of the nanite swarm and activating all defenses to turn against you. After a lengthy battle with the security, the trail stops at the lobby, where HAROLD takes control of the AID robotic tracker unit statue to halt your advance.
Much like the other fights with the AID robotic tracker units, this fight with HAROLD relies on proper timing for deflection. The hardest aspect in fighting HAROLD is his damage output, as he can burst you down pretty easily if you’re not careful. He’s also quite nimble, and with his bigger size, the lobby will feel a bit more crowded in comparison to the Brother Eli fight. However, seeing as HAROLD is basically just a giant version of the AID robotic tracker units, he shares most of their move sets and weaknesses, which you can really use to your advantage.
Preparation
The lead-up to the HAROLD fight is a bit brutal, given that you will be ambushed at nearly every turn by the facility’s security bots. The only forgiving aspect is that these don’t respawn, meaning that subsequent attempts to go to the lobby is pretty straightforward.
For the optimal weapon, the best results come from electrical weapons. During your foray into the Cathedral of the Spark, you will come across some high-ranking members wielding a powerful spear called the Fanatical Excruciator, which sports high electricity damage and impact. This is easily one of the best weapons in the game thanks to its speed, reach and damage output, and it will do wonders against HAROLD here, who is susceptible to this element as he’s a robotic enemy. The Fanatical Excruciator is a version of Brother Truman’s Faith, and if you missed getting this weapon from him you can exchange it with this. Check out a guide of how to get Brother Truman’s Faith early in the game here.
There’s also another way of getting Brother Truman’s Faith while in the Cathedral if you missed out on it the first time around. In one of the rooms in the second level, there’s a non-hostile cult member who will try to initiate you to join the Children of the Spark. In order to get initiated and obtain the weapon, you must answer his three questions correctly within three attempts. Here are the correct answers:
- An angelic lightning bolt (the mark of the banners of the Children of the Spark)
- Little Johnny (boiled to death by an unholy interloper, referring to the overheating method you used to kill him)
- … the world will change! (frequently referenced by Brother Eli in his audio logs)
After answering all three correctly, you will be rewarded with Brother Truman’s Faith. If you already have it in your inventory, you will not get anything else, but it does complete the quest.
Besides the electrical weapons, you can also use nanite-infused ones if you’re going for more damage. However, seeing as HAROLD is also enhanced with nano capabilities, it will not be as effective as going for proper stuns with the electric element.
For armor, anything that allows for less stamina consumption while dodging is preferable, as you’re also going to be evading a fair bit in addition to the constant directional blocking. The LYNX armor set works wonders here in that regard.
Fighting the robotic security will also give you the chance to harvest their parts. All of them can be beneficial to the fight against HAROLD, given that they are focused on giving you regeneration and healing to counter the boss’s brutal onslaught:
- Bloodied PROTEUS Set – found on the enemies in the Hangar before Guttenberg’s lab. They will drop from the ceiling in all four corners of the area, and you can easily harvest their parts to complete the set. The partial set bonus grants you health regeneration while your health is low, and the full set increases the health restored by injectables.
- PROTEUS Set – found on the robots you fight in Guttenberg’s lab. It has the same bonuses as the Bloodied PROTEUS Set, but boasts better stats overall.
Both of these sets are safe options for the fight and beyond thanks to how powerful the healing effects can be, especially against more powerful enemies.
Once you’ve decided, you can now head to the lobby to finally face HAROLD.
Watch out for burst damage
Unlike other bosses which will tend to wear you down slowly over a flurry of attacks, HAROLD can outright kill you in one to three hits in succession. As soon as you enter the fray (provided that this is not your first attempt) he will leap at you immediately from across the room, dealing damage more than or equal to half of your maximum health. This attack is unblockable and has incredibly aggressive tracking, and you’d do well to dodge it properly or suffer a massive blow before the fight even begins.
Since it tracks like crazy, you will want to save your dodge for the very last moment, just before the attack hits you. Running around is also an option, but given the lobby’s fairly small size and HAROLD’s large frame, this is not as reliable. The lunge has a pretty massive tell; once HAROLD bellows and releases a honking sound, he will leap almost immediately afterwards. Try to get a feel for timing it, as this attack is easily his most damaging.
Once the fight actually starts, place your target lock on his tail, which is his main source of damage. This tail can be dismembered through a finisher, but just like other AID robotic tracker units, HAROLD may live through it if his health is not low enough. HAROLD will also start to use a holographic tail once you’ve cut the original one. You can also try to lock onto his limbs, but they are far beefier, and cutting off the tail briefly removes his best source of damage throughout the fight.
HAROLD shares the same move sets as his AID robotic tracker unit contemporaries, with some add-ons here and there. For instance, the circling tail attack hits twice instead of once, and the tail thrust can hit for up to three times. The annoying backflip attack is still there and is pretty much the same; that said, he will most likely follow it up with the unblockable leaping attack if he’s far away from you.
HAROLD does have some new attacks to try and eliminate you as well. First off, he has a tail slam that discharges nano damage, which is unblockable but can be dodged pretty easily. He can also summon holographic miniature copies of himself which will rush you to deal electrical damage. These can be easily destroyed with a hit of your weapon, so keep close to him once he summons them in order to stop them from rampaging. Alternatively, you can dodge them from afar, but staying in that range makes you very susceptible to his powerful leaping attacks.
Once HAROLD gets down to half-health, his attacks become more powerful and relentless. The tail slam, for instance, hits twice now and does electrical damage instead of nano. He also summons four holographic copies instead of the usual two. By this time, you should have made a dent on his tail or limbs, and cutting it off should deal a ton of damage, nearly enough to finish the fight. If there’s a substantial amount left, he will replace his tail with a holographic one that deals more damage, so it would be better to finish him off as quickly as possible.
Other helpful tips to remember
- The Starfish will come in very handy here to apply electrical build-up, and it’s easily spammable thanks to its low cooldown. Always keep it ready and up whenever possible.
- Due to a bug or glitch, it’s possible to avoid his tail whips if you’re very near him and colliding with his model. It’s great to exploit this while you can, and dodge in towards him whenever he does the tail circling attack if you can’t properly time it for a deflection.
- All of HAROLD’s attacks have sound cues, which makes him easier to anticipate. You want to memorize what sound goes with what attack, as they usually have a bit of delay between them that acts as a sign that he’s about to perform a specific attack next.
Aftermath
Once you eliminate HAROLD, you will be rewarded with his Holographic Tailblade, should you managed to perform a finisher on the tail beforehand. This is a powerful Single-rigged weapon for those who prefer the category, easily boasting one of the highest base damages out of all weapons in the entire game.
From here on out, you can now break through the corrupted structures in Jericho City, unlocking more shortcuts to explore and secrets to discover. The next leg of your journey takes you back deep within AID Command, and it’s the last stretch of the game. Consider backtracking now to other places for more secrets you may have missed, as well as those that were previously inaccessible.
Before you leave CIT, however, two people will contact you one last time. If you’ve been following the Stranger’s storyline, he will offer to meet with you one last time as the dark secrets of AID and Jericho City finally come to light. You can choose to do this first, which can also lead to one of the game’s endings depending on your choice.
Athena will also contact you, telling you to take your place at her side as Brother Eli marches towards her monstrous new form in order to take away her powers and remake the entire world in his image. This sets you on the endgame, as you face Brother Eli one last time for the fate of Jericho City and the world.
Stay tuned for more guides on The Surge 2. The game is now available for PC, PlayStation 4 and Xbox One. Check out my review for The Surge 2 here. You can also check out other The Surge 2 guides below:
- Beginner’s Guide
- Warden Garcia Boss Guide
- Best Starting Weapons and Armor
- URBN Gear Set and URBN Judgement Axe Location
- Little Johnny Boss Guide
- Brother Eli Boss Guide
- Lost Seed Locations In Gideon's Park
- Captain Cervantes Boss Guide
- Delver Boss Guide
- Major General Ezra Shields Boss Guide
- Resurrected Brother Eli Boss Guide
- Exceptional combat mechanics.
- Well-implemented RPG system.
- Interesting level design, dense and filled with secrets and hidden routes.
- Good difficulty curve, extremely tough at times but completely fair.
- Improved storyline, with much more interesting characters.
- Fair bit of replay value.
- Great art, enemy and world design.
- Forgettable music.
- Some technical issues like animation jank and visual bugs.
- Constant backtracking may prove to be tedious to some people.


