
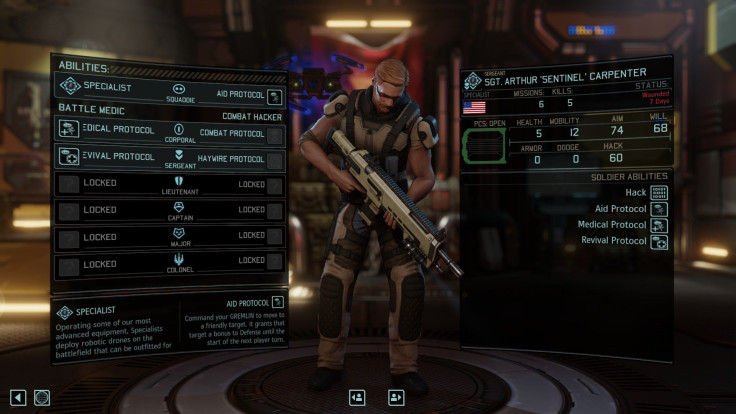
This XCOM 2 class guide is intended to help you figure out the ins and outs for one of the more versatile classes in the game: the Specialist. At first, the specialist appears to be a bit of a namby-pamby class: no big explosions, a wimpy drone that can heal allies or shock enemies for middling amounts of HP and no obvious upside like squadsight or melee attacks. But as you start to dig a little deeper on the Specialist skill tree you’ll soon discover that the Specialist is the support class to end all support classes. A well-trained specialist can snatch victory from the jaws of defeat in one or two turns with some very clutch special moves.
'XCOM 2' Specialist Guide: Dynamite Hacking
Hacking. Hacking is my new favorite thing in XCOM 2 . Holy shnikes is hacking ever useful. When navigating the specialist skill tree make sure to take the Haywire Protocol perk. It’s a second tier perk so you’ll get it fairly early, and it allows you to hack into mechanized enemies as well as surveillance equipment for some game-changing advantages.
When hacking mechanized enemies, from the lowly mech to the towering Sectopod, players can either choose to shut them down or take control of them for a few turns. The length of time depends on the skill of the hacker, and the success rates for stuns have a much higher percentage than a full takeover. So you can either play conservative and try to shut down mechs or, if you’re like me, you can spam the quickload button over and over and over until you successfully hack a mech.
And you’ll want to, because a hacked mech is a life saver.
For starters, nearby enemies will focus on the hacked mech, which makes it a de facto mimic beacon instantly. This is especially useful when a mech accompanies a squad of weaker ADVENT troops because, instead of getting flanking positions set up against your soldiers, the ADVENT will haphazardly scatter around the mech and start firing giving you a positional advantage on your next turn.
Obviously, having control of a mech (or even better a Sectopod) means you can deal some damage to the enemy. However, most mech units aren’t powerful enough to just lay waste to a whole squad. In fact, you might not even get a kill on your first round controlling one. Instead, I recommend using a hacked mech to create chaos. Stand next to an enemy in cover and fire missiles on yourself and your foe. The mech takes damage (you will need to kill it eventually because you can’t control a hacked mech for more than 2-3 turns depending on your skill), the foe takes damage and loses cover. You want to use the grenades up quickly because, in the event you can’t kill the mech before you lose control, you don’t want to leave it with valuable munitions to use against you.
In addition to hacking mechs, a good specialist can also hack into security systems to gain different bonuses. So far, the most useful bonus I received allowed my squad to take an extra turn, but most bonuses impact things like crit chance and accuracy. plus, a specialist can use the drone to hack things remotely, which is especially useful on VIP rescue missions when you need to break into a locked door to free a VIP that is usually behind several enemies. I typically encounter at least two things to hack on each missions, so I’ve found a talented specialist to be indispensable on just about every mission I run.
But there’s more to the Specialist than just hacking. There’s skulljacking, too.
Skull Jack City
The skulljack is a piece of equipment that needs to be unlocked in the Proving Ground. It can be used by anyone on the squad, but grants a significant bonus to hacking skill and is best suited for Specialists. I don’t want to reveal any story spoilers as to why you need it, so I’ll tell you what it does. The skulljack allows you to hack into an enemy’s brain to retrieve info, sometimes quest-related and sometimes just a bonus like intel, by shoving a big translucent spike into an enemy’s brain.
Yes, this kills the enemy regardless of health.
Yes, this is a melee attack that lets you close gaps on the battlefield by streaking across it.
Yes, this is super, super useful.
Throughout my 20+ hours of gameplay the skulljack has saved me countless times by one-hit killing Elite Shieldbearers and officers before they get a chance to start passing out the buffs. The success of the skulljack depends on the hacking skill of the tropp using it, again showing that this is basically a tool for Specialists. And having a specialist be able to one-move kill enemies that even sharpshooters and rangers can’t eliminate during a turn suddenly casts the class in a new light. For a support class, the specialist is capable of the most aggressive and reliable offensive strike in the game. Pretty impressive.
First Aid Can’t Come Second
For as useful as the Specialist’s hacking abilities are, when you looks at the skill tree it only requires one dedicated perk - the haywire protocol. Everything else on the skill tree that can be spent on medical attention, should be. This means you want to get Medical Protocol at tier one, Field Medic and tier three and Restoration at Tier 6.
You can get the Revival Protocol on some specialists after you have at least two with the Haywire Protocol activated. Reviving downed soldiers is not nearly as useful as hacking the machines that down them in the first place.The Specialist becomes an especially useful medic once you are able to upgrade the Gremlin drone. It will heal extra damage and get an additional turn to heal soldiers as well.
Who Will Overwatch The overWatchmen?
Finally, the final perks on the Specialist skill tree you should have on your early game specialists is the Covering Fire/Guardian combo. These perks, at tiers four and five, augment the Overwatch ability for your specialist and makes them a much more dangerous stationary soldier. After all, the Gremlin drone can cover anywhere on the battlefield so you can park your specialist behind some full cover and, in many cases, move them about as often as you do your sharpshooters.These perks make it so that a specialist that’s standing still remains a threat.
Covering fire allows your specialist to fire overwatch shots on enemy actions, not just movement. So an enemy in cover that fires at your squad will now have an overwatch shot fired back at it. Combine this with the Guardian perk that allows for a 50 percent chance of another shot being taken if the first is successful and you have a pretty devastating recipe for alien bloodletting on your hands. This is especially useful in those XCOM 2 missions with time limits, as eliminating enemies between turns means you have one less foe to worry about on your dedicated turn. Seriously, killing a Muton that’s hiding in cover with two overwatch shots is about as satisfying as XCOM 2 gets.
Below is the full skill tree for Specialists, courtesy of ufopaedia (I’ve highlighted the perks I recommend putting on your early specialists):
XCOM 2 Skill Tree: Specialist
Tier 1 (Corporal):
Medical Protocol
The Gremlin can perform healing actions remotely.
Grants one free Medkit charge.
Combat Protocol
Send the Gremlin to an enemy to jolt them, dealing guaranteed damage, which is increased against robotic enemies.
The basic Gremlin deals 2 damage. Usable twice per battle.
Tier 2 (Sergeant):
Revival Protocol
Send the Gremlin to an ally to remove any negative status effects: Disoriented, Stunned, Panicked, or Unconscious.
Haywire Protocol
You may target robotic and mechanical enemies with your Gremlin, attempting to hack them and seize control.
Tier 3 (Lieutenant):
Field Medic
Equipped medikits have 2 extra charges
Scanning Protocol
The Gremlin can trigger an instant scan of the area, increasing the Specialist's sight radius substantially for one turn, and revealing any hidden or disguised enemies in view.
Tier 4 (Captain):
Covering Fire
Overwatch shots can be triggered by any enemy action, not just movement.
Threat Assessment
Aid Protocol now grants the target a Covering Fire overwatch shot, but the Aid Protocol cooldown is increased by 1 turn.
Tier 5 (Major):
Ever Vigilant
If you spend all your actions on moves, you are granted an automatic overwatch shot at the end of the turn.
Guardian
With every successful overwatch shot, there is a 50% chance that another shot will be taken.
Tier 6 (Colonel):
Restoration
The Gremlin flies to each squad member, healing or reviving them as needed.
Capacitor Discharge
Send the Gremlin to a location where it emits a substantial electric discharge, damaging and potentially stunning all nearby units. Robotic units take more damage.
Got any tips for XCOM 2 ? Think this specialist guide is total BS? Let us know in the comments section!


