

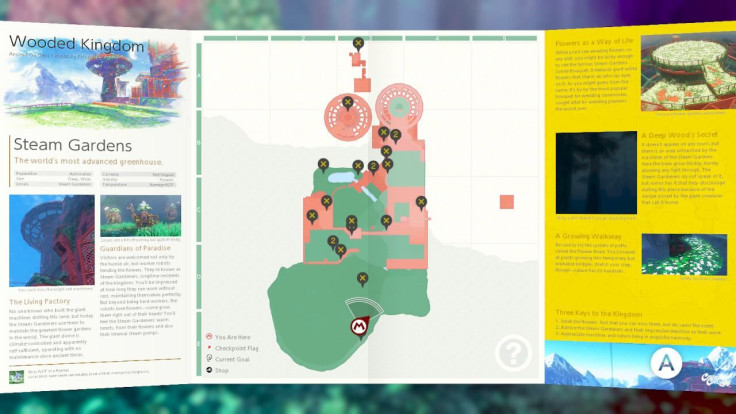
Power Moons in Super Mario Odyssey are the new Stars, which means you need to collect as many as possible! Each Kingdom has a minimum number of Power Moons you must collect in order to to advance to the next Kingdom, but there are many more hidden through each level.
The Wooded Kingdom requires players to find 16 Power Moons to advance. However, if you want to see everything the level has to offer, you’ll need to find a whopping 76 Power Moons. Some of these can only be found after you complete the main story.
Minor spoilers below, so read at your own risk:
Power Moon #1 - Road To Sky Garden
Complete the maze from #15 to get to an area filled with spitting Piranha Plants. Avoid the goop and throw Cappy at the biggest plant. It will fall over, so jump on it to kill it. Once gone, you’ll get the Power Moon as a reward.
Power Moon #2 - Flower Thieves Of Sky Garden
Once at the top of Sky Garden Tower, you’ll enter into a boss fight. Clear the goo to get close enough to throw your hat at the Broodal, then jump on him. Avoid his spinning hat move after, then repeat two more times to kill him. You'll get a Multi Moon.
Power Moon #3 - Path To The Secret Flower Field
From the Iron Mountain Path Station 8, climb a steep slope up to a grassy area with three Sherms. Capture one and take out the others, then go through the field to the big, green thing shooting cannonballs. Blast the four Bowser circles with the Sherm to get the next Power Moon.
Power Moon #4 - Defend The Secret Flower Field!
Defeat the boss Torkdrift to unlock this Multi Moon. Capture an Uproot and break the three groups of blocks to flip Torkdrift over, then grow under it to land an attack on its glass dome. Repeat until dead, while avoiding the laser rings it shoots out.
Power Moon #5 - Behind The Rock Wall
Once done with the Goomba Tower for #21, continue forward in this area by climbing up the ledges. The next area has a few Sherms, so capture one and take out the others. From here, blast away at the top left corner of the huge cliff in front of you to reveal a Power Moon. Make a path to climb up, then go get it.
Power Moon #6 - Back Way Up The Mountain
Once you reach Iron Mountain Path Station 8, capture an Uproot and smash the gray blocks in the corner. This will reveal an opening. Go down it to find an 8-bit warp pipe. Complete the 2D stage to find a Power Moon at the end.
Power Moon #7 - Rolling Rock In The Woods
There are a number of small rocks right by the Odyssey you can break by running into them. Keep kicking up every rock you find in the area until you uncover one that glows. This one will take a few more kicks to break, but has a Power Moon inside.
Power Moon #8 - Caught Hopping In The Forest
There’s a rabbit hopping around by the Odyssey. Get close enough for a dive tackle or to hit the rabbit with Cappy and it will hand over another Power Moon.
Power Moon #9 - Thanks For The Charge!
Once the Recharge Station is unlocked, go find the long line of bots waiting to recharge at the stations. Find an empty station that is glowing, and ground pound on it to make the Power Moon appear.
Power Moon #10 - Atop The Tall Tree
Start at the Odyssey and go behind it to find a ridge that runs along the edge of the Kingdom. Walk along this ridge until you get to a larger area with Uproots. Capture an Uproot and climb up the ledges sticking out from one of the trees. Keep climbing until you find a nut, then run into it to break the nut open.
Power Moon #11 - Tucked Away Inside The Tunnel
Follow the same path as #10, and capture an Uproot once you’re at the larger area again. From here, drop down to the stream, and follow it around to a Fire Bro. Kill the Fire Bro, then grow as high as you can. You’ll need to release the Capture at the highest point to send Mario to a ledge above the platform. Once on this high ledge, crack the nut to get the Power Moon.
Power Moon #12 - Over The Cliff’s Edge
Start by looking at the wall from #5, by the Summit Path flag. Go to the right of the wall to find a series of outcroppings. Jump from one to the other, until you get to a series of bars to swing from. Jump along the bars to the end of the path and find a nut with a Power Moon inside.
Power Moon #13 - The Nut ‘Round The Corner
Go to Iron Road: Entrance and find two Uproots above the pond. Capture one and follow the patch around the side of the building until you see a crumbling path. Grow while walking down the path and jump up to a ledge. Grow once again to find a nut and a Power Moon.
Power Moon #14 - Climb The Cliff To Get The Nut
After getting #11, keep going down this tunnel to the platform with a lever on it. Throw Cappy at the lever to make it open the door. Go through the door and Capture an Uproot. Grow yourself to climb onto the cliff above you and move your way down this path. Kill the Fire Bro that shows up and crack the nut at the end of the path for the Power Moon.
Power Moon #15 - The Nut In The Red Maze
From the Iron Road: Entrance flag, make your way to the red moving puzzle platform and climb up it. Capture an Uproot and continue to climb up until you get to a big cliff with a few plain brick blocks. Go to the left to uncover a hidden vertical maze. Raise up the platform then break a few plain brick blocks. Jump up and get on top of the other blocks, and continue moving to the right. Climb up a little further to find a nut to crack and a Power Moon.
Power Moon #16 - The Nut At The Dead End
Directly to the right of where you killed the big Piranha Plant for #1, there’s a gap in the handrail. Drop down to a platform below, and after capturing an Uproot, climb up to the next ledge on the path. Follow this to the end to find a nut to break and a new Power Moon.
Power Moon #17 - Cracked Nut On A Crumbling Tower
Once you kill the Piranha Plant from #1, press the P-switch that shows up. Follow the path of growing vines to a platform with another P-switch and some floating rickety boxes. Jump quickly across the boxes and climb the tower on the other side for a nut to crack and a Power Moon to collect.
Power Moon #18 - The Nut That Grew On The Tall Fence
Start at the Iron Mountain Path Station 8 flag and capture an Uproot nearby. Climb back over to the station flag and you’ll see a robot. Jump over the guard rail to the top of the wall below. Continue along the wall over the next hurdle, and there will be a nut on the other side. Crack it open for a Power Moon.
Power Moon #19 - Fire in the Cave
From the Iron Road: Entrance flag, walk towards the moving puzzle and go to the left of it to find a pathway that wraps behind the rocks. You’ll see a scarecrow, so throw Cappy on it to open the door next to it. There’s a Fire Bro in here, so jump on his head to claim your Power Moon.
Power Moon #20 - Hey Out There, Captain Toad!
Capture a Glydon at the Observation Deck and walk along a narrow ledge with Purple Coins on it. Fly off to the East to find an isolated tower with Captain Toad on it. Talk to Toad for the Power Moon.
Power Moon #21 - Love In The Forest Ruins
From the Forest Recharge Station, move forward to find several small stacks of Goombas. Capture the stack of three, then hop onto the stack of two. Grow yourself until your Goomba stack is eight high, then talk to the Lady Goomba in a red hat. She’ll give up a Power Moon.
Power Moon #22 - Inside A Rock In The Forest
Capture a Sherm by the Forest Charging Station, then drive it off a cliff towards the Odyssey. Once by your ship, blast away at large rocks to find this Power Moon.
Power Moon #23 - Shopping In Steam Garden
Buy this moon from the Crazy Cap store by the Odyssey.
Power Moon #24 - Nut Planted In The Tower
Continuing along the path from #17, there’s another P-switch on the platform. Jump on that to follow the vines inside the Sky Garden Tower. Hit the P-switch and follow the vines up the tower until you find an Uproot. Capture it and continue up until you find an inlet on the big cylinder in the center of the room. Go in here and grow until you crack a nut and get a Power Moon.
Power Moon #25 - Stretching Your Legs
Once inside the Sky Garden Tower, reach the top of the cylinder and grow until you get the Power Moon. It’s in the center of the platform.
Power Moon #26 - Spinning-Platforms Treasure
Get to the top of the wall after completing the 2D segment from #6. Look down the far side to see a triangular platform. Drop down, then continue dropping down to lower platforms. You’ll get to a path that takes you to big, spinning crosses. Jump along the crosses to get to the treasure room on the other side.
Power Moon #27 - Making The Secret Flower Field Bloom
Drop down to the secret flower field and use Spin Throws to make all three circles of flowers bloom at the same time. A Power Moon will appear when you've done it right.
Power Moon #28 - Rolling Rock In The Deep Woods
Find a rock you can kick along the edge of the Deep Woods, and kick it until it breaks open.
Power Moon #29 - Glowing In The Deep Woods
Find the scarecrow in the Deep Woods. Throw Cappy at it to start a timer. Run towards the huge trees in front of you; the Power Moon is behind the trees. This might take a few tries to find an optimal path before the Power Moon disappears. If it does, simply throw Cappy back on the scarecrow and try again.
Power Moon #30 - Past The Peculiar Pipes
Find a warp pipe sticking out of a wall along the edge of the Deep Woods. Go in it and you’ll start a maze of going down pipes. The sequence changes every time, so good luck figuring out the maze.
Power Moon #31 - By The Babbling Brook In The Deep Woods
First, find a series of smashable rocks along a cliff face by the pond in Deep Woods. Transform into the T-Rex and smash the rocks, revealing a glowing patch of dirt. Ground pound this to get the Power Moon.
Power Moon #32 - The Hard Rock In Deep Woods
Find a pile of hard rocks near a Beanstalk location, capture the T-Rex and smash the rocks to bits. You’ll find a spot of glowing ground here, so ground pound it to get the Power Moon.
Power Moon #33 - A Treasure Made From Coins
First, find the pond with an odd green plant surrounded by gold bumps. Once found, go capture a Coin Coffer and fire coins at the plant. It will start to grow, then eventually produce fruit after hundreds of coins have been shot at it. Once you hear it produce fruit, climb the tree next to it to get the Power Moon at the top.
Power Moon #34 - Beneath The Roots Of The Moving Tree
Once in the Dark Woods, find a climbable hill with a pine tree on top of it. Capture the tree and move a little out of the area, and the ground beneath where the tree was will glow. Ground Pound here to get the Power Moon.
Power Moon #35 - Deep Woods Treasure Trap
Find a warp pipe at the base of a huge tree in the Deep Woods. Go in, then open the three treasure chests in this order: Middle, left, right.
Power Moon #36 - Exploring For Treasure
Buy the Explorer’s Outfit and Explorer’s Hat from the shop in Wooded Kingdom. Put them on, then find a robot in the Deep Woods standing by the waterfall. Talk to him, and he’ll grant you access to a room with a Power Moon.
Power Moon #37 - Wooded Kingdom Timer Challenge 1
Throw Cappy at the scarecrow next to the Iron Road: Halfway Point flag. Swing and jump along the red bars to get to the top and the Power Moon.
Power Moon #38 - Wooded Kingdom Timer Challenge 2
Throw Cappy at the scarecrow in one of the charging stations at Forest Charging Station. This creates platforms above you, so climb up as fast as you can to get the Power Moon.
Power Moon #39 - Flooding Pipeway
Enter the pipe at the bottom of the pond by Iron Road: Entrance. Use the rising and falling water in this challenge area to jump over or swim under obstacles until you reach the end and the Power Moon.
Power Moon #40 - Flooding Pipeway Ceiling Secret
Go through the same pipe as #39, but don’t finish the level. Reach the upper platform in the middle of the level, then use a ground pound jump by the gap in the ceiling. This will expose two walls, so start wall jumping your way to the top. You’ll find another Power Moon up here.
Power Moon #41 - Wandering In The Fog
At the Recharge Station, climb a small tower to find a rocket. Capture the rocket and blast off into a foggy area. You need to collect all the Moon Shards here, so get the easy two first then capture a Paragoomba. Follow the path of coins to find the other pieces.
Power Moon #42 - Nut Hidden In The Fog
Once you find the shards for #17, go back to the start of the fog area and follow the path toward the ? blocks and a platform with three Paragoombas. Capture one and fly down behind the platform to find an area of concrete and a nut. Break it open for another Power Moon.
Power Moon #43 - Flower Road Run
Go to the right side of the steep ramp by Summit Path to find a ledge above the coins. Wall jump up here to find a red Cappy door. Enter it and press the P button to start a road of vines. Follow the vines to the end to get the Power Moon.
Power Moon #44 - Flower Road Reach
Do the same steps for #43, but once inside the door, capture a Goomba. Create a tall Goomba stack with all the Goombas in the area, then follow the vines to a platform. End the capture and shoot yourself onto the top of the platform for this Power Moon.
Power Moon #45 - Elevator Escalation
When at the base of the steep ramp by the Summit Path, don’t turn to get to Station 8. Instead, keep running straight along the right side. You’ll get to a flat spot with a Cappy door, so enter it. Capture the Sherm here and press the P-switches to get to the bottom. Blast away any enemies you find. Once you clear out the other Sherms, you’ll find the Power Moon locked in a cage. Blow up the cage, and the Moon is yours.
Power Moon #46 - Elevator Blind Spot
Go to the same location as #45, but don’t press the P button. Turn around and blow up the wall behind you for this Power Moon.
Power Moon #47 - Walking On Clouds
Get the seed from the robot right outside of the Secret Flower Field Entrance and carry it to the P-block on the other side of the field. Press the P-block to start a series of timed platforms to get up to the Observation Deck. Plant the seed in the planter up here and climb onto the big vine.
Capture the Uproot and ride the moving blocks to the end of the path. Once on the last block, grow up through the rings and jump to get the Power Moon.
Power Moon #48 - Above The Clouds
Follow the steps for #47 to get to the right area. During the course of the moving blocks, there’s one big block you need to get climb onto with lots of coins on it. Move to the top of this block to find the Power Moon.
Power Moon #49 - Secret Path To Steam Gardens!
In Metro Kingdom, leap over the guardrail by the Odyssey to a walkway below. You’ll find a painting here. Jump through the painting to get this Power Moon.
Power Moon #50 - Found With Wooded Kingdom Art
To get the hint for this one, find some Hint Art at the base of a tree by the Odyssey. The clue says to go to the Sand Kingdom and find a Koopa in a sombrero. He’s the one that gives the Trace Walking challenge. From him, walk directly north until you’re on the Northern edge of the desert. Find two shrubs that look like the hint art and ground pound in front of them to get the Power Moon.
Power Moon #51 - Swing Around Secret Flower Field
Get on top of the wall by the Secret Flower Field Entrance by completing the 2D segment from #6. From here, make your way over the Secret Flower Field entrance to the wall on the other side. Climb down a pipe and look for a red bar to swing on. Jump to the bar and swing until you get to a P-switch and a key. Grab the key and hit the switch to follow the vines to the Power Moon.
Power Moon #52 - Jammin’ In The Wooded Kingdom
Find Toad on a platform above the waterfall by Crazy Cap after defeating Bowser. Toad will ask for a song recommendation, so say Track 75 - Above The Clouds for a Power Moon.
Power Moon #53 - Wooded Kingdom Regular Cup
Talk to the Koopa by the Forest Charging Station to start a race after defeating Bowser. First, jump over the railing down to the Iron Road: Entrance area. From here, complete the Red Maze like you did to get the #1 Moon. If you’re the first one done, you win the prize of a Power Moon.
Power Moon #54 - Peach In The Wooded Kingdom
After defeating Bowser, you'll find Peach and Tiara at the top of the map by the Observation Deck. Talk to them to get this Power Moon.
To gain access to Power Moons 55-76, you’ll need to return after defeating Bowser and smashing the moon rock that is located to the east of the first bridge. It will show where the rest of the Power Moons are.
Power Moon #55 - High Up In The Cave
Capture an Uproot and take it into the cave the Sphynx used to be guarding. Grow to your max height and find this Power Moon.
Power Moon #56 - Lost In The Tall Trees
Once you reach the Observation Deck, Capture a Glydon and fly back to the Odyssey. There’s a box hidden at the top of one of the big trees, so smash it to release the Power Moon. Once released, fly over to Summit Path to pick it up.
Power Moon #57 - Looking Down On The Goombas
Get the Glydon from the Observation Deck and glide towards the Odyssey. You’ll find a wall with a nut on it. Land on the wall to break open the nut and get the Power Moon.
Power Moon #58 - High Up On A Rock Wall
Find the three gray blocks by the maze in between Iron Road: Entrance and Iron Road: Halfway Point. Capture an Uproot and climb on the blocks to reach a nut and another Power Moon.
Power Moon #59 - The Nut In The Robot Storeroom
Get an Uproot and take it to the storeroom that houses the beanstalk up to the Forest Charging Station. Look above the entrance to find another nut with another Power Moon.
Power Moon #60 - Above The Iron Mountain Path
Capture the Glydon on the Observation Deck and fly down over the pond area by Iron Road: Entrance. The Power Moon is floating around over here.
Power Moon #61 - Nut Under The Observation Deck
Capture the Uproot by the Station 8 flag and take it to the P-block you would trigger to get up to the Observation Deck. Instead of pressing the P button, move along toward the railing and grow to find four hidden blocks. Hop on these and grow again to find a nut below the Observation Deck.
Power Moon #62 - Bird Travelling The Forest
There’s a sparkling bluebird flying around, so hit it with Cappy for a Power Moon. A good spot to hit the bird is by the platform on the north side of the Sky Garden Tower with a P-switch on it.
Power Moon #63 - Invader In The Sky Garden
Defeat the Yoofoe on top of the Sky Garden Tower to get a Power Moon. Build up a tower of Goombas to reach the big purple button and hit that a few times to take the Yoofoe out.
Power Moon #64 - Hot, Hot, Hot From The Campfire
Capture a Fire Bro and take it down by Talkatoo. There’s an unlit campfire here with a visitor from the Luncheon Kingdom. Light the campfire as the Fire Bro for a Power Moon.
Power Moon #65 - Wooded Kingdom Timer Challenge 3
Warp to Station 8 and jump over the railing down to a triangular platform. There’s a scarecrow here, so throw Cappy at it to start the time trial. There’s a Power Moon waiting on the other side.
Power Moon #66 - Moon Shards In The Forest
There are five shards in the red maze in between Iron Road: Entrance and Iron Road: Halfway Point. Find them all for a Power Moon.
Power Moon #67 - Taking Notes: On Top Of The Wall
Find the Treble Clef by where Moon #10 was, near the waterfall. Run through it, then start rolling along the ridge to collect all the music notes before time runs out. You must be rolling to get them all in time.
Power Moon #68 - Taking Notes: Stretching
Get the Uproot by Station 8 and descend down to the right of Iron Road: Entrance. Find the treble clef on a rock ledge and run through it. Grow yourself to collect all the music notes that show up.
Power Moon #69 - Wooded Kingdom Master Cup
Talk to the Koopa by Forest Charging Station to start the Master race in Wooded Kingdom. The finish line is in the same place as the Normal Cup, but the competition is faster. You might need to skip the Uproot to get through the maze if you can’t finish fast enough.
Power Moon #70 - I Met An Uproot!
Capture an Uproot and make your way to the tower from Moon #17. Talk to the Bonneter to get a Power Moon.
Power Moon #71 - Invisible Road: Danger!
Take the Moon Pipe at the Secret Flower Field Entrance down to an area with hidden platforms. Use the goop from the Piranha Plants to find out where the platforms are, then use Cappy to clear a space for you to walk on them. Make your way to the end of this area for a Power Moon.
Power Moon #72 - Invisible Road: Hidden Room
Get to the rotating platform in the middle of the room from #71, then jump off the opposite side you jumped on from. It doesn’t look like it, but there is a hidden walkway to land on. Take this into a secret room for a Power Moon.
Power Moon #73 - Herding Sheep Above The Forest Fog
Enter the Moon Pipe near the lady Goomba from Moon #21. Guide each sheep through the mazes, but don’t go too fast. You might scare the sheep right off the platform.
Power Moon #74 - Herding Sheep On The Iron Bridge
There’s another warp pipe to enter once you get to the sheep herding level for Moon #73. Go into this second warp pipe for another sheep herding mission. Knock the sheep over the edge before pressing the P-block, as the bridge will only appear for a short time. Chase after the sheep and get it to the other side of the bridge as fast as possible.
Power Moon #75 - Down And Back Breakdown Road
Enter the Moon Pipe by Iron Road: Entrance. Run all the way down this level to get to the key, avoiding all the incoming Bullet Bills. You don’t need to capture a Bullet Bill for this Power Moon. Once you have the key, run back to where you started from to unlock the cage with a Power Moon inside it.
Power Moon #76 - Below Breakdown Road
To claim the last Power Moon in the Wooded Kingdom, go back down the Moon Pipe for #75. Once you get the key again, wait for a Banzai Bill to show up. Dodge his attack, then drop to the lower level, where you’ll find a second Banzai Bill. Capture this one too, then guide him back to the start of the level, where you’ll find a big wall to blow up. This reveals the last Power Moon.
To find the Power Moon locations for the other levels in Super Mario Odyssey, check out our other Kingdom Guides:
So what do you think? Have you managed to find all of the Power Moons in the Wooded Kingdom? Are you waiting to finish the main story before going back to 100 percent each level? Let us know your thoughts in the comments section below.
- Visually pleasing
- Great Story
- Controls are amazing and uses Switch motion controls the best
- Great new characters and environments
- Could be more difficult
- Camera angles can get annoying