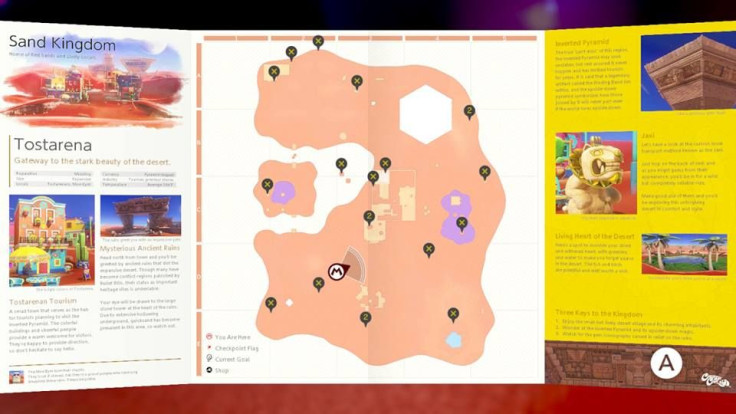
The Sand Kingdom in Super Mario Odyssey is one of the more expansive worlds in the game. And to reflect that, there are 89 Power Moons to collect throughout your adventure there.
Completionists will want to collect every Power Moon in every Kingdom, but it can be a bit tricky. Most of the Power Moons in each Kingdom won’t be accessible until after you complete the story. In the Sand Kingdom, you’ll only be able to obtain 69 Power Moons before beating the story, so be sure to come back when you’re done.
Since there are so many Power Moons in Super Mario Odyssey , we’re breaking down each Kingdom in separate stories.
To find the Power Moon locations for the other levels in Super Mario Odyssey, check out our other Kingdom Guides:
- Cap Kingdom Power Moon Locations
- Sand Kingdom Power Moon Locations
- Wooded Kingdom Power Moon Locations
- Lake Kingdom Power Moon Locations
- Cascade Kingdom Power Moon Locations
- Cloud Kingdom Power Moon Locations
- Lost Kingdom Power Moon Locations
- Moon Kingdom Power Moon Locations
- Metro Kingdom Power Moon Locations
- Seaside Kingdom Power Moon Locations
- Luncheon Kingdom Power Moon Locations
- Bowser’s Kingdom Power Moon Locations
- Ruined Kingdom Power Moon Locations
- Snow Kingdom Power Moon Locations
Power Moon #1 - Atop the Highest Tower
After visiting Tostarena Town, make your way to the Round Tower. Once you reach the top, you’ll be gifted a Power Moon.
Power Moon #2 - Moon Shards in the Sand
When you first enter the Moe-Eye Habitat you’ll have to capture one and find the five moon shards. Find them all and you’ll get a Power Moon.
Power Moon #3 - Showdown on the Inverted Pyramid (3)
While making your way to the Inverted Pyramid you’ll have to defeat one of the Broodal. Do so and you’ll be given three Power Moons.
Power Moon #4 - The Hole in the Desert (3)
After defeating the Broodal, the Pyramid will move and create a whirlpool that leads to another area. Enter it to defeat the boss of the Kingdom.
Power Moon #5 - Overlooking the Desert Town
Atop the bell tower in town, leap to the highest point to get this Power Moon.
Power Moon #6 - Alcove in the Ruins
Near the three sand geysers, drop into the sand and go around the corner to the base where the sand is spilling. There’s a narrow pathway beneath where the 8-bit level is, where a Power Moon awaits.
Power Moon #7 - On the Leaning Pillar
You’ll see this Power Moon floating on one of the Pillars. Head up onto the ruins, capture a Bullet Bill and accelerate to get to it.
Power Moon #8 - Hidden Room in the Flowing Sands
Go to the Tostarena Ruins and go to sand level. Go to the right of the three sand geysers and find a slight gap in the wall directly below the round tower. There’s a secret room in there, but you’ll have to let Mario sink into the sand to access it.
Power Moon #9 - Secret of the Mural
Go to the Tostarena Ruins round tower and go into the 8-bit pipe. Go to the top of the level but don’t leave, there’s a crack below the Glydon where a secret room holding a Power Moon is located.
Power Moon #10 - Secret of the Inverted Mural
In the Inverted Pyramid enter the 8-bit level. Make your way past the stream of upside-down Goombas outside the pyramid and find the crack in the wall past the pipe. Leap through it to find a hidden area where the Power Moon is.
Power Moon #11 - On Top of the Stone Archway
Ride the Spark Pylon in town toward the ruins. Release the capture above the arch to get the Power Moon.
Power Moon #12 - From a Crate in the Ruins
Still updating
Power Moon #13 - On the Lone Pillar
Go to the top of the round tower and capture a Glydon. Use it to land on the pillar that’s all by itself toward the north. A Power Moon is waiting.
Power Moon #14 - On the Statue’s Tail
At the top of the floating Inverted Pyramid, there’s a Jax statue with a glowing tail. Throw and hold Cappy to get a Power Moon to release.
Power Moon #15 - Hang Your Hat on the Fountain
Once the ice has thawed, go back to Tostarena Town and go to the fountain in the middle of the town. Throw Cappy on the spout at the top and a Power Moon will appear.
Power Moon #16 - Where the Birds Gather
If you notice a flock of yellow birds near the walls of Tostarena Town, go to where they are gathered on a mound. Feel the vibrations and then ground pound when it’s strongest to reveal a Power Moon.
Power Moon #17 - Top of a Dune
Southwest of Tostarena Town, climb to the tallest dune and feel the rumble in your controller. Ground pound where the vibrations are strongest and get a Power Moon.
Power Moon #18 - Lost in the Luggage
In the area where a giant ice spear has encapsulated the car, there’s a glowing spot near the cardboard and tire. Ground pound to reveal a Power Moon.
Power Moon #19 - Bullet Bill Breakthrough
In the ruins, capture a Bullet Bill and fly until you see a Goombetta. Fly through the hold below it and break the Power Moon free from the prison.
Power Moon #20 - Inside a Block is a Hard Place
At the Tostarena Ruins Sand Pillar, there will be a some rock formations with one of the blocks glowing. Capture a Bullet Bill and navigate your way around the blocks until you reach the glowing one to break loose a Power Moon.
Power Moon #21 - Bird Traveling the Desert
Wait atop the rooftop cactus in Tostarena Village or a palm tree in the Desert Oasis until a glowing bird appears. Hit it with Cappy to get a Power Moon. You may need to ground pound jump to reach it.
Power Moon #22 - Bird Traveling the Wastes
In the northeast part of the Sand Kingdom, there are the wastes (the purple poison lakes) where another glowing bird appears. Hit it with Cappy to get another Power Moon.
Power Moon #23 - The Lurker Under the Stone
If you ride the electrical wire to the Inverted Pyramid, you’ll see a Power Moon under the stones. Chase down the bump, which runs away like the rabbits, and stun it with a hat toss. Ground pound it to get your Power Moon.
Power Moon #24 - The Treasure of Jaxi Ruins
Get through the frozen pillars of the Ice Cave (see Power Moon #50) to exit a pipe atop Jaxi Ruins. Open the left-hand treasure chest to get your Power Moon.
Power Moon #25 - Desert Gardening: Plaza Seed
There are three pots in Tostarena Town, pick up a seed that’s lying on the ground and toss it into one of the pots. Come back after a while to see it sprout. Hit it with Cappy to get a Power Moon.
Power Moon #26 - Desert Gardening: Ruins Seed
Near the leaning pillar (the one where #7 is located) there’s another seed. Grab it and carry it back to where the three pots are in Tostarena Town. Plant it and wait for it to sprout to receive a Power Moon.
Power Moon #27 - Desert Gardening: Seed on the Cliff
On the southwest edge of Sand Kingdom, there’s another seed. Drop down a ledge to find it, grab it and then go around the corner to find a hat trampoline. Set the seed down, hit the trampoline with Cappy and then pick the seed back up and jump up over the ledge. Go back to Tostarena Town to plant the third seed and get another Power Moon.
Power Moon #28 - Sand Kingdom Timer Challenge 1
Atop the ruins at Tostarena Northwest Reaches, complete the Bullet Bill Maze (Power Moon #56) or ride the electrical wires down from the Inverted Pyramid. Activate the scarecrow to reveal a ton of blocks that lead to a Power Moon. Wall jump to reach the top and the Moon.
Power Moon #29 - Sand Kingdom Timer Challenge 2
In the Moe-Eye Habitat (the Easter Island statue things), you’ll see a P-Switch in the southwest corner. Activate it to reveal a U-shaped path. Use Moe-Eyes shades to reveal it and grab the key and unlock the Power Moon.
Power Moon #30 - Sand Kingdom Timer Challenge 3
Near the pools of poisonous waste, another Timer Challenge awaits. This time, you’ll need to cross three platforms that go across the poison lake before they disappear. You’ll need to build up speed and the best way is by going down a hill heading toward the first platform.
Power Moon #31 - Found in the Sand! Good Dog!
There’s a dog on the south side of Tostarena Town: follow it into the desert. The dog will stop and begin to dig, this is where you ground pound and find a Power Moon.
Power Moon #32 - Taking Notes: Jump on the Palm
In the Desert Oasis, climb the palm tree with the treble clef to start the trial. Collect all the notes while jumping between palm trees to get the Power Moon.
Power Moon #33 - Herding Sheep in the Dunes
In the desert between the ruins and the Inverted Pyramid, you’ll find a Tostarenan shepherd talking about his three missing sheep. They are not hard to find. Use Cappy to knock all of them into the corral to receive your Power Moon.
Power Moon #34 - Fishing in the Oasis
In the Desert Oasis, capture Lakitu to go fishing in the lake. Look for shadows of the fish in the water, go for the largest shadow to find a Cheep Cheep holding a Power Moon.
Power Moon #35 - Love in the Heart of the Oasis
Find the Goombette in the Sand Pillar area. Capture a Goomba and dodge the Bullet Bill as you make to a hat trampoline. Release the capture, hit the trampoline and re-capture the the Goomba to use the trampoline to make it to the Goombette and earn a Power Moon.
Power Moon #36 - Among the Five Cactuses
Use the Jaxi to travel to the Northwest Reaches and find five cacti in a row. Use the Jaxi to go through all five, but beware, the middle cactus has the Power Moon. If it goes into the canyon, you’ll have to leave the area and come back when it respawns.
Power Moon #37 - You’re Quite a Catch, Captain Toad!
At the Desert Oasis, capture Lakitu and go to the hill on the north side of the oasis. You’ll see are shadows of fish swimming in the sand. Use the fishing ability to grab the largest shadow which is actually Captain Toad. He’ll give you a Power Moon.
Power Moon #38 - Jaxi Reunion!
Get on a Jaxi and ride to the area northeast of the Desert Oasis. There will be a Jaxi statue facing an empty platform, ride the Jaxi onto the platform to get a Power Moon.
Power Moon #39 - Welcome Back, Jaxi!
Ride up to the Inverted Pyramid and locate where a Jaxi Statue has gone missing. Call a Jaxi from the Jaxi stand nearby and ride it onto the empty platform. You’ll receive a Power Moon.
Power Moon #40 - Wandering Cactus
North of the Desert Oasis there’s a tall cactus with a green button on top. Capture the cactus and walk the cactus to the side until a glowing spot is revealed. Ground pound to get a Power Moon.
Power Moon #41 - Sand Quiz - Wonderful
After answering the Sphynx’s first question (#51), stand in front of the Sphynx again to answer four more questions. The answers are 30, ice, 5 and Sphynx.
Power Moon #42 -
Purchase the Power Moon from Crazy Caps for 100 Gold Coins.
Power Moon #43 - Employees Only
In Tostarena Town, you’ll find a gate on the side of a building near the Crazy Cap store. Crouch down and enter it to go to Crazy Cap from the back down. There’s a Power Moon waiting.
Power Moon #44 - Sand Kingdom Slots
Near the fountain in town, enter the slots room and pay 10 coins to play. Time it right and get three moons to receive a Power Moon.
Power Moon #45 - Walking the Desert!
Talk to the Koopa northwest of the Desert Oasis to do the first Trace Walking Challenge. Study the arrows that briefly appear, then walk the exact same path as the arrows from memory. There’s no rush so take your time. Get a score above 80 to receive a Power Moon.
Power Moon #46 - Hidden Room in the Inverted Pyramid
Inside the Inverted Pyramid, after completing the 8-bit levels, capture one of the Bullet Bills and guide it across the chasm to the moving pillars. There’s a gap where the pillars disappear on the left side. A ramp will lead you to a room with a Power Moon.
Power Moon #47 -
On the edge of the ice area in the Inverted Pyramid, lure a Bullet Bill and capture it. Fly around the stone column on the right to some hat trampolines. Bounce on them to get to the top of the column, then run along the narrow wall to get an invisible block at the end. Leap on the block and onto the next tower where the Power Moon is.
Power Moon #48 -
In the ice area underneath the desert, capture the Goomba and leap over the pulse beam’s radiating burst of energy. Shake the controller to make the Goomba high jump onto the stone ledge. Release the Goomba and quickly capture the stack of ten Goombas further on. The radiating blast might knock this Goomba stack down from ten to eight. If so, hurry back along the ice and capture the two Goombas you passed earlier on.
Release the Goomba near the platform with the blocks and capture three Goombas and leap onto the Goomba tower to cross the ice as a tower of 11 (12 is too many). Keep going along the ice until you reach the Power Moon.
Power Moon #49 - Under the Mummy’s Curse
In the Deepest Underground, a bunch of Chinchos appear. There’s a coin coffer to the left of the slingshot in the same area, grab the coins and fire them using the slingshot to defeat the Chinchos.
Power Moon #50 - Ice Cave Treasure
In the northeast corner of the ruins is a whirlpool of sand. Sink in to go to the ice cave. While there, use the hat trampoline to reach the ledge above. Reach the area of rising and falling pillars and make your way up to the upper row where a Power Moon is located.
Power Moon #51 - Sphynx’s Treasure Vault
On the northwest corner of the ruins you’ll find a Sphynx. The answer to his question is “Ring.” Answer correctly and he will give you a Power Moon.
Power Moon #52 - A Rumble from the Sandy Floor
In Tostarena Town, you’ll find a pipe on one of the roofs. Inside is a small room with a Power Moon in the floor. Walk until the vibrations are the strongest and then ground pound to get the Power Moon.
Power Moon #53 - Dancing with New Friends
Purchase the Sombrero and Poncho from Crazy Cap and put them on. Travel to the northwest corner of town to talk to a Tostarenan who is standing guard, he’ll let you into the private club. Walk onto the stage: a musical number will play and a Power Moon will be yours.
Power Moon #54 - The Invisible Maze
At Moe-Eye Habitat, there’s a ledge on the north canyon that will lead you into a maze. Capture the Moe-Eye inside and use its ability to see the invisible path but memorize it because you can only travel across as Mario. Make your way to the end to find the Power Moon.
Power Moon #55 - Skull Sign in the Transparent Maze
In the same area as #54, there’s a danger sign in the first room. Throw and hold Cappy at it to reveal a Power Moon.
Power Moon #56 - The Bullet Bill Maze: Break Through!
In the Northwest Reaches, enter the red door and capture a Bullet Bill. Make your way to the revolving wall and begin navigating through the wall to find the steps leading to the Power Moon and the exit.
Power Moon #57 - The Bullet Bill Maze: Side Path
In the same area as #56, swap out a Bullet Bill for another one near the first lattice wall. Return the way you came and enter the side path to the left and make your way to the Power Moon.
Power Moon #58 - Jaxi Driver
On the top of Jaxi Ruins, hop on the Jaxi located there and leap off the ruins. Take the Jaxi across the waste into the doorway of Jaxi Ruins at the ground level (there are two small cacti here). This will give Mario access to an obstacle course. A Power Moon awaits you if you complete it.
Power Moon #59 - Jaxi Stunt Driving
In the same area as #58, take the Jaxi to the large central area of the obstacle course. You’ll find a treble clef that will activate a trial, complete it within the time limit to get a Power Moon.
Power Moon #60 - Strange Neighborhood
On the top of the building in Tostarena Town there is a rocket. Capture it and it will take you to a special area. Get through this area to find a Power Moon.
Power Moon #61 - Above a Strange Neighborhood
In the same area as #60, make your way to the level with three Goombas. Leap onto the platform with three blocks and climb on them. Hit the invisible block above it and jump and climb that block to reach a Power Moon.
Power Moon #62 - Secret Path to Tostarena!
In the Lake Kingdom, go to where Lakitu is fishing. Head to the courtyard area and locate the painting in the pool where Lakitu is. Enter it and you’ll be transported to the Sand Kingdom where a Power Moon awaits.
Power Moon #63 - Found with Sand Kingdom Art
On the southeast building of Tostarena Town, there’s a piece of Hint Art. This art hints at Bowser’s Kingdom.Once you travel there, go to the souvenir shop and go six steps from the shop and three steps from the flag. There will be stones there that you can ground pound to get a Power Moon.
Power Moon #64 - Jammin’ in the Sand Kingdom
Go to the roof of the southeast building in Tostarena Town to find Toad listening to music. He wants to hear some battle music so go into your archives to pull up a song with the word “Battle” in it. Play it for him and he’ll give you a Power Moon.
Power Moon #65 - Hat-and-Seek: In the Sand
In Tostarena Town, a Bonneter can be found disguised as a Sombrero on a local. Find the eyes on one of the sombreros and speak to him. He’ll give you a Power Moon.
Power Moon #66 - Sand Kingdom Regular Cup
At the Northwest Reaches, talk to the Koop to open up the race. Use a Jaxi to make your way into town where Crazy Cap is.
Power Moon #67 - Binding Band Returned
In the hole west of the Inverted Pyramid, go down into the Deepest Underground. Use the slingshot there to reach the temple above. Ground pound where the Binding Band is to get a Power Moon.
Power Moon #68 - Round-the-World Tourist
After defeating Bowser, talk to the Tostarenan near the taxi. This will start a quest where this local will travel to different Kingdoms and you have to find him in all of them. In order, follow him to: Metro Kingdom, Cascade Kingdom, Luncheon Kingdom, Moon Kingdom, Mushroom Kingdom and then Sand Kingdom.
Power Moon #69 - Peach in the Sand Kingdom
Once Bowser is defeated, you’ll find Peach in every Kingdom. In the Sand Kingdom, she can be found at the top of the Inverted Tower using the electrified wire.
Power Moons #70-89 will only appear after returning to the Sand Kingdom and finding the Moon Rock.
Power Moon #70 - Mighty Leap from the Palm Tree!
Go to the Desert Oasis and climb the palm tree with a Power Moon floating above it. Ground pound jump to get the Power Moon.
Power Moon #71 - On the North Pillar
Using the wire atop the Round Tower to get to the top of the Inverted Pyramid. Ride the wire down from the northwest corner and leap off as you pass the lone tower with a Power Moon.
Power Moon #72 - Into the Flowing Sands
Just above the flowing sand inside the ruins at the base of the stairs is the Power Moon
Power Moon #73 - In the Skies Above the Canyon
At the top of the round tower, get on the moving platform. Use Cappy to trigger the radiating explosions that break through the blocks. Stay on the right-hand platform as it gets close to the Power Moon, then leap for it before the platform descends.
Power Moon #74 - Island in the Poison Swamp
Get on a Jaxi and ride towards the wastes near Jaxi Ruins. There’s an island in the middle of the waste, so ride over to the Power Moon.
Power Moon #75 - An Invisible Gleam
Go to the Moe-Eye Habitat and capture a Moe-Eye. Ride it up the lift and use the sunglasses to spot the glowing beacon on the north pillar. Release the capture and ground pound to get a Power Moon.
Power Moon #76 - On the Eastern Pillar
On the top of the east pillar in Jaxi Ruins, there’s a block that contains a Power Moon, however the only thing able to break it is a Bullet Bill. First, go to Tostarean Ruins Sand Pillar and capture a Bullet Bill. Ride it toward the right-most learning pillar and get out. Wait for another Bullet Bill, then tackle jump to the next leaning tower. Wait for the Bullet Bill to get as close as possible before you capture it.
Then you have to race to the area where the block is located. Shake your controller to get speed bursts on your way.
Power Moon #77 - Caught Hopping in the Desert!
Another rabbit appears and you have to catch it. This time, there are three. These will appear together in the desert. Catch one and you’ll have a Power Moon.
Power Moon #78 - Poster Cleanup
At Northwest Reaches, speak to a local who complains about the posters. Toss Cappy at the posters to knock them off until you’re finished.
Power Moon #79 - Taking Notes: Running Down
There’s a Jaxi Stand in the southwest corner of the desert and a Treble Clef nearby. Activate it and grab all of the notes before time runs out.
Power Moon #80 - Taking Notes: In the Wall Painting
In the Round Tower, enter the 8-bit level and find the Treble Clef on the second level. Activate it and get all of the notes before time runs out.
Power Moon #81 - Love at the Edge of the Desert
Another Goombette (this one located on the northern edge of the desert) has appeared. Capture a Goomba and find the Gambetta.
Power Moon #82 - More Walking in the Desert
Return to the Koopa at the Desert Oasis to activate another walking challenge. You have to score over 90 points to get a Power Moon.
Power Moon #83 - Sand Kingdom Master Cup
Just like the Regular Cup, you should use a Jaxi to win. Defeat the Koopa and win yourself a Power Moon.
Power Moon #84 - Where the Transparent Platforms End
To the south of Tostarena Town, go down the Moon Pipe and capture a Moe-Eye. Use the sunglasses to make your way over invisible moving platforms. Finish the maze to get a Power Moon.
Power Moon #85 - Jump Onto the Transparent Lift
In the same area as #84, use the Moe-Eye to get to the second moving platform near the start, then drop onto the ledge to ride it to the key. An invisible platform rises from either side so choose one and get your Power Moon.
Power Moon #86 - Colossal Ruins: Dash! Jump!
At Tostarena Ruins, go down the pipe near the Goombas to go to another temple. Capture the Spark Pylon and then the Rocket Flowers to have Mario speed toward the rings. Keep moving until you reach a sinking wall on the left, steer Mario along the wall and pick up the Power Moon in the distance.
Power Moon #87 - Sinking Colossal Ruins: Hurry!
In the same area as #86, but go down the sinking wall after the third set of rings to grab a key. Turn to the left after grabbing it to go up, then reach the end of this level where a stone bridge appears. This will lead you back to the start and the Power Moon.
Power Moon #88 - Through the Freezing Waterway
Use the pipe at the Inverted Pyramid to enter a water level. Capture the Gushen and use it to get to the Power Moon at the end of the level.
Power Moon #89 - Freezing Waterway: Hidden Room
In the same area as #88, make your way to the section with the moving platform. Stay to the left and continue the path until you reach the hidden Power Moon.
- Visually pleasing
- Great Story
- Controls are amazing and uses Switch motion controls the best
- Great new characters and environments
- Could be more difficult
- Camera angles can get annoying