Exploring for new habitats in Mass Effect Andromeda take us to some strange worlds. The icy planet of Voeld features a harsh, frigid climate. Meanwhile, Elaaden is a planet that introduces us a dry, arid desert landscape. Last week, we shared the "Restoring a World" side quest that made Voeld a more habitable place. You'll be tasked to restore Elaaden's climate conditions this time – here's how it's done:
In the Mass Effect Andromeda "Taming A Desert" side quest, Elaaden's monoliths will lead to another Remnant vault waiting to be activated in order to reset the planet's climate. The monoliths are located in the northern, western, and southern areas of the map, marked N, W, and S.
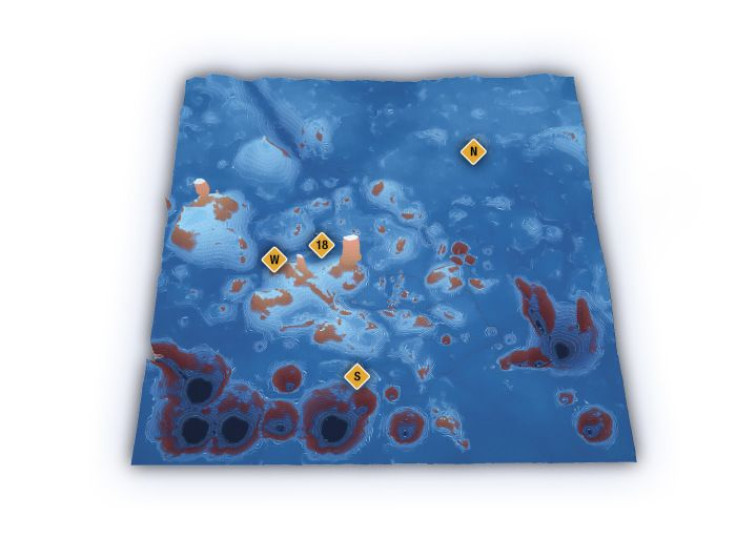
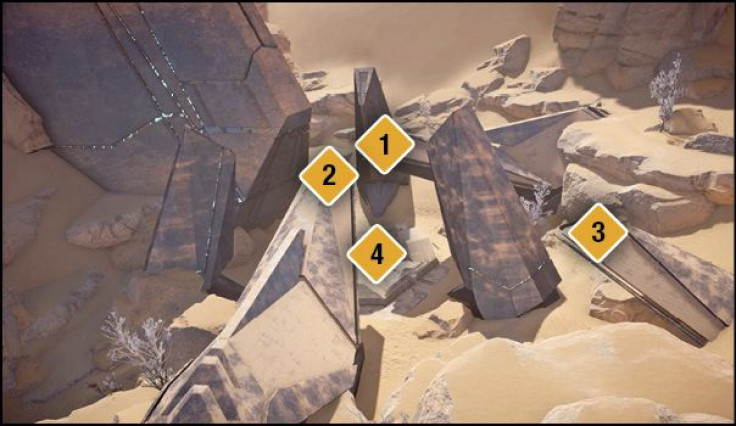
Head to the Sea of Ataraxia to begin with the North Remnant Monolith (N). This Monolith will have a Remnant puzzle that will require three missing glyphs to solve. The Accretion Glyph is located on the top of the pillar marked 1 in the diagram, the Hydrodynamic Glyph is on the pillar marked 2, and finally the Stratosphereic Glyph is on top of the lower pillar marked 3. Bring all three glyphs to the North Monolith's Remnant console, marked 4.
With all the glyphs in hand, enter the glyphs in the following order on the Remnant console.
Next, head over to the West Remnant Monolith (W), which is located just east of the westernmost forward station. Look for the Verdurous Glyph on the top of the pillar marked 6, then grab the Nihility Glyph at 7 and finally jump to 8 to retrieve the Magnitude Glyph. Thankfully this time you can just take all the glyphs and head over to the West Monolith's Remnant console at 5 to activate it – there is no puzzle to solve this time!

Lastly, the South Remnant Monolith (S) is located in Paradise Sands in the south. The South Monolith is the most complex of the three, featuring three separate consoles for you to interact with. The console marked 9 activates the tallest pillar, marked 14. Next, The console marked 11 activates both pillars marked 12 and 13. Finally, if pillar 12 is not in the right place, then you can move it independently at the console marked 10.
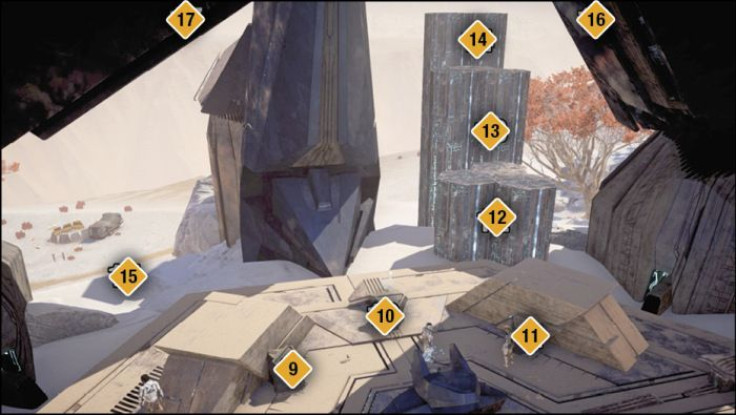
Each console acts to raise various pillars both left and right of the monolith. It's a confusing contraption for sure, but don't get distracted by the left pillars – you won't be needing them. By raising all three pillars on the right side, marked 12, 13 and 14, you will be able to reach the glyphs at the top.
When you reach 13, platform jump to the right monolith tower, marked 16 to scan the Semiosis Glyph. Next, move on to 17 for the Synaptic Glyph. Finally, hop your way to the last and farthest tower in order to scan the Zero Glyph.
With the Semiosis, Synaptic, and Zero Glyph in hand, you will be able to activate this final monolith. Once again, no Remnant puzzle is needed at the Southern Monolith.
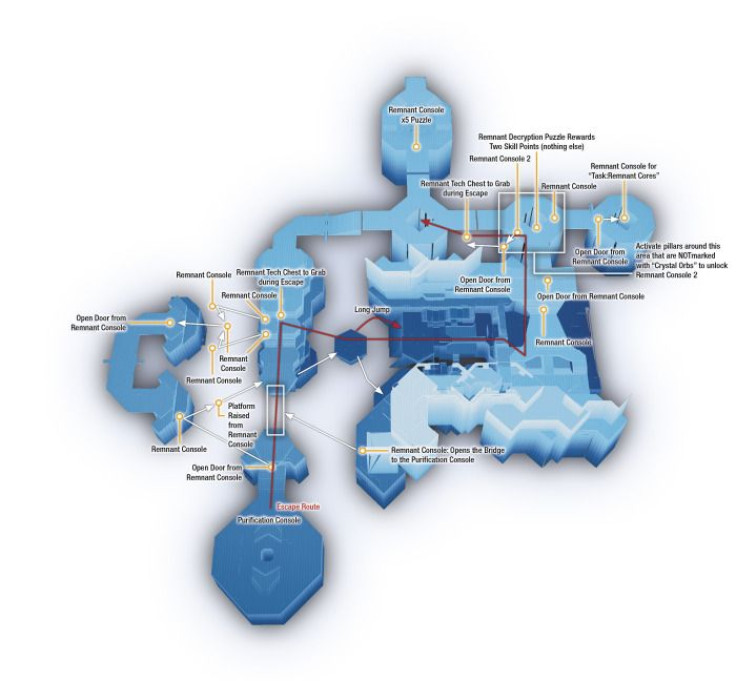
With all Monoliths activated, head over to the Languish Remnant Vault, located in the center of the Elaaden map.
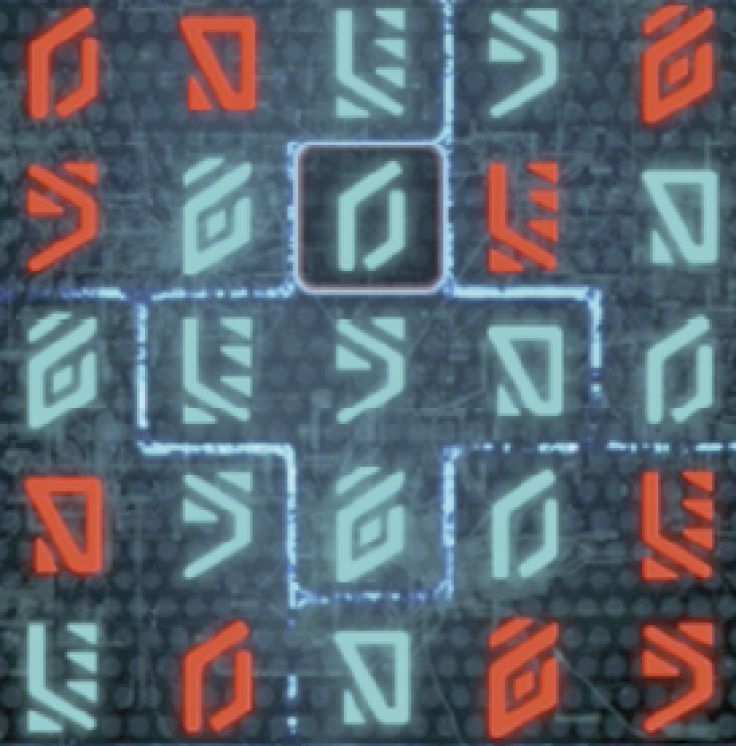
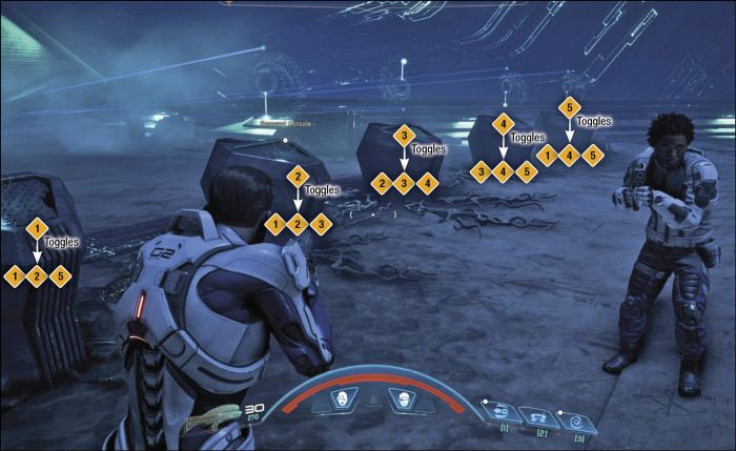
The entrance of the vault features a pretty difficult puzzle that requires you to work with five consoles to open one locked door. Each of the consoles work to toggle three out of five connections of the door. What you must do is set each console so that all five connections on the door light up.
The first console toggles connections 1, 2 and 5. The second console toggles connections 1, 2 and 3. The third console toggles 2, 3 and 4; the fourth console toggles 3, 4 and 5; and the fifth toggles 1, 4 and 5.
Head south and follow the west path from the intersection once the puzzle is completed. You will encounter a second, and thankfully, less complicated, puzzle. Activate the two consoles, which will trigger platforms on the west side to rise. The platforms can be used to jump up to the higher platforms. You must activate the two high platform consoles and return to the two previous consoles to re-toggle. The sequence activates the central platform and enables the far-west door to open.
You must then go through the door and loop around the western section, fighting Remnant Assemblers as you re-enter the main area from the southwest. Now, you will arrive at another Remnant console that will interface with a door that opens a bridge to the purification console and also raises a platform to the northeast to return to the central hub of the vault.
Return to the center peninsula and from there, you must perform some more platform jumps to reach the southeast portion of the map. Toggle this Remnant console to the south in order to reveal the bridge to the purification console room. Activate the vault to complete the "Taming of the Desert" side quest.
Return to the bridge from the purification console and defeat the Remnant guarding a console. Find your way back to the vault entrance.
But before you escape from the vault, there might be a couple of things left that you may wish to do, namely the two containers. Refer back to the Vault map (you'll have to scroll up) to follow the Escape Route marked with a red line.
For a gameplay guide of Mass Effect Andromeda Taming a Desert quest, check out the video from YouTuber ShackD below: