The first Destiny 2 raid is finally here!
Fans are still trying to uncover all of Leviathan’s secrets and identify strategies for the raid, and millions of players are hoping to clear the raid once or twice to get some new loot for their favorite Guardian(s). And many still prefer written guides to the litany of video tutorials popping up on YouTube and Twitch. So we’re here to help!
Before beginning the raid, Bungie suggests getting your Power level into the 260 - 280 range. 270 is actually the recommended level listed in the Director. We also suggest finishing the On The Comms quest because the next phase, Await the World-Eater, is completed in the raid. But finishing the World-Eater assignment won’t be nearly as easy as getting it started. Even some of the most dedicated raiders in the Destiny 2 community needed six hours for their first run.
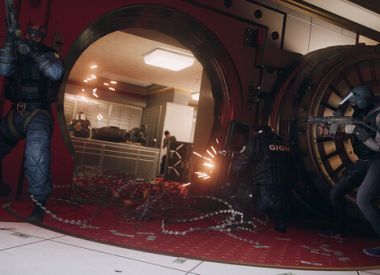
Your fireteam will begin the raid in front of a locked door, guarded by ornately-armored members of the Cabal. Don’t attack anyone until your entire team is ready to fight. We suggest assuming positions around the Colossi at the top of the stairs and bursting them down first. Finish the fight and wait for the doors to open. Welcome to Leviathan.
The Castellum
You’re going to see a lot of the Castellum over the next few hours, so get familiar with the whole space before starting. You’ll need to be familiar with the location of the four gold triangles -- each bearing a purple circle with a unique symbol -- spread throughout the zone. Once you’re ready, find the first Standard Bearer and kill him.
Once the Standard Bearer dies, grab the relic (a golden staff) left behind. Locate the gold triangle -- there are four in the Castellum, found on the floor near each potential exit -- with a glowing symbol that matches your first relic. Once the relic has been placed, you’ll need to divide into teams of three. One group must stay behind and protect the relic from Standard Liberators, identified by the plumage on their pauldrons, while the second group kills the next Standard Bearer and returns with a second relic.
After two relics have been placed, Councilors will join the enemies spawning near your defenders. It’s imperative to kill these enemies quickly by charging inside their dome and punching them, otherwise they’ll put shields on nearby Liberators making them immune todamage. We suggest trying to save at least one Super during this phase so you have a quick solution for any Liberators who get too close while you’re hunting down the Councilor. Once the away team returns with the third relic, the door will open and you’ll receive your first batch of Leviathan raid loot.
A Quick Word On Checkpoints
Checkpoints were a big deal in Destiny 1 . The system was intended to prevent teams from having to revisit sections of the map if/when they were forced to split the raid into a two-night affair. But it also meant players who’d finished part of a raid couldn’t team up with their friends who hadn’t raided that week, because the checkpoint system would prevent them from seeing certain enemies (including bosses). But checkpoints have been replaced by a maze of corridors, that make the entire Leviathan accessible to your team. If you know how to navigate them.
For more on navigating the Leviathan’s hidden corridors, head over to the Destiny sub-reddit .
Now back to our regularly scheduled programming...
Royal Pools
After escaping the Castellum the first time, your fireteam will find itself in the Royal Pools, an outdoor environment with pools of purple liquid hazardous to Guardians. And the next trial requires even closer coordination.
Once again, you’ll divide up into groups of three and split the map into left and right halves. Two members will wait near the upper and lower medallions on either side, while the third player from each trio heads to the center chamber. Once everyone is in place, step onto the medallions and wait for the chains to begin moving. And now things get tricky.
The goal is to have a player with the Psionic Protection buff, which starts at 50 and ticks down anytime you’re standing in the pools, standing on the medallions until the white stones on each corner chain have been lowered into place. But the only place to get the buff, once the event has started, is from the sun medallion in the center of the gardens.
So here’s what you need to do:
Once the event begins, the players in the lower left and right pools should defend their positions (without leaving the pressure plate) until there’s 20-30 charges left on their Psionic Protect buff. At this point, the player from the center (assigned to their side of the map) should charge in and replace them on the pressure plate.
The player who left the pressure plate needs to sprint back to the middle and replenish their Psionic Protection buff -- ideally, killing a few adds in the process -- and then go swap spots with the person on the top-level pressure plate.
The person who was waiting on the upper plate heads to the middle, replenishes the Protection buff, and then relieves the player from the lower plate. And that rotation continues until you hear a sound signifying the damage phase.
We suggest keeping a shotgun equipped while the chains are lowering. Ceremonial Bathers will continue to spawn near the pressure plates, making it tough to stay on the plates, but the power weapons, especially Hawthorne’s Field-Forged Shotgun , make quick work of the Bathers.
Once the damage phase begins, the entire team needs to sprint back to the central chamber and jump onto the sun platform. From here, you can damage the newly-exposed gold and purple lanterns spread around the room. You should definitely be able to destroy four or five before they become damage-immune again. But you’re unlikely to get all nine in one go.
After the lanterns are locked again, melee the Projection who appears in the center of the chamber and shoot the one who appears a short time later hovering in the air. Now return to your starting positions and lower the stones back into their locking mechanisms again.
Rinse and repeat until all nine lanterns have been destroyed. Then claim your second raid chest and return to the Castellum.
The Castellum (Pt. 2)
Subsequent trips to the Castellum will play out just like the first. The only difference is that you’ll be placing your relics in a different spot. Find your next mark, divide up into teams again and repeat the process from your first trip.
Pleasure Garden
The path to success in the Pleasure Garden manages to be both simpler and more complex than your trip through the Royal Pools. After clearing the room, your team must divide into a group of four and a pair of guides. The guides will hold the Prism Weapons that spawn at the back of the zone, above the safe room where you’ll hide throughout the fight. The other four go down into the room and retrieve glowing orbs from the back wall.
From here, the two players acting as guides must guide the pollen-holders to glowing flowers around the zone. Once players are in position around the flowers, use the Prism weapon to detonate the flower, showering any nearby players with Empowering Spores. Try to shower the team several times before being spotted by one of the six named beasts. You can stack the buff up to 60 times and the number of charges you receive from each flower increases based on the number of players present.
Once you’ve been spotted, the team has about 10-15 seconds to deal as much damage as possible before retreating back into the safe room and waiting for the beasts to return to their patrols. Try to spread your damage between all six beasts, as most players tend to agree that this phase of the raid is much easier without the permanent Restless buff bestowed on the surviving beasts. Ideally, you’ll kill all six during the same damage-dealing phase.
It sounds relatively simple but (just like D1 raids) this stealth portion is tough for large swaths of the Destiny 2 community.
The Gauntlet
Before the fight begins, pick two members of your team to be bomb runners. Once that’s determined, four members of the fireteam can step onto the four pillars to start the encounter. Fight the Cabal, there will be waves of enemies (including a mini-boss) until a pair of Psionic Charges spawn at the Chalice and Warbeast gates.
Your bomb runners need to grab the Charges, which will teleport them to the outer ring of the zone. The remaining four players must divide into pairs and quickly relocate to the pillars the bomb runners were teleported to. At this point, the runner will see a three-by-three grid and the duos will each be able to see a set of three arrows. When a red ring appears on the grid, runners need to identify which row (top, middle or bottom) on which it appears. The corresponding duo then needs to shoot the other two arrows. For example, if the runner sees the ring on the top row, his partners need to shoot the middle and lower arrows simultaneously. We cannot possibly overstress that last part enough. Both arrows must be shot at the same time. One player from each duo should deal with the Psion that spawns nearby (and his shadow, if you botched the arrows). Then everyone rotates clockwise and repeats the process until the runners reach the end and dunk their Charges in the middle of the room.
Repeat that process three times. When all six charges are returned to the center, every player has to grab one and take one last lap. But there’s a twist. Each player has a timer and will die if/when it reaches zero. So you’ll need to coordinate and make sure everyone is able to pick up enough glowing orbs on the path to keep their timers going. Leaving two players behind won't work for most teams because you won't be able to finish your lap before the death timer expires. So everyone needs to run at least part of the circuit. If four-plus members of your fireteam survive the final lap, it's on to Leviathan’s final challenge.
The Final Boss
The encounter won’t begin until you shoot the cup in the boss’ hand.
Once the fighting starts, focus on adds until the boss teleports everyone into another dimension. Split up into teams of three. One team needs to stay in the alternate dimension while the other grabs the orbs that will return them to the boss’s chambers. At this point, several Psions will spawn in the regular dimension. DO NOT SHOOT THEM (yet). Players still inside the alternate dimension will call out the symbols that appear on the projection’s forehead. Psions with those symbols should be ignored and the omitted psion should be killed. Their deaths will shift the barrier, in the alternate dimension, that keeps the away team separated from the projection. Repeat this process until the away team gets close enough for the head to spit skulls at them.
Update: If you're struggling, there's an exploit that removes Calus' adds
The away team should shoot the skulls, and avoid any that get too close, until another batch of orbs spawn to bring them back to the boss’s chambers. With the fireteam reunited, jump to one of the elevated platforms nearby (everyone should go to the same one) and begin firing at the boss. When he becomes immune to damage, switch to a new platform and unload again. Rinse and repeat until all the platforms have been used. At this point he’ll return to this throne and begin glowing. If you don’t kill him before he finishes charging, the whole team will be wiped.
Destiny 2 is currently available for PlayStation 4 and Xbox One. The game hits PC on Oct. 24
Be sure to check back with Player.One and follow Scott on Twitter for more Destiny 2 news in 2017 and however long Bungie supports Destiny 2 in the years ahead.