
If you’re looking for solutions to Breath of the Wild ’s Divine Beast Vah Ruta terminal puzzles, then we here at iDigitalTimes have got your back. Solutions for all five terminal puzzles as well as hints for Ruta’s boss fights can all be found here. So if you’re ready to solve the Breath of the Wild Ruta terminal puzzles and defeat the boss in the Divine Beast Vah Ruta dungeon, check out the Ruta walkthrough in our Legend of Zelda: Breath of the Wild guide below.
Before Entering Ruta
This dungeon becomes available as a fast travel location as soon as you reach it, allowing you to warp in and out as you please. If you’re missing an important item or need to restock, this warping ability is especially helpful.
To keep the warps to a minimum, bring along the following: healing dishes, powerful weapons of attack 15 or more, and 30 or more arrows. The arrows and powerful weapons are especially important in the fight against this dungeon’s boss, Waterblight Ganon.
Please note: this guide does not tell you where to find the seven treasure chests in the Vah Ruta dungeon. You have to have something to reach for yourself, right? This guide is strictly for Vah Ruta terminal solutions and Waterblight Ganon tips and tricks.
Controlling Divine Beasts: The Divine Beast map is three-dimensional and can be rotated with the right control stick. You need to add the map to your Sheikah Slate, so use the Cryonis rune to lift the iron grate against the wall in the first room of the dungeon. This will let you into the map room where you’ll be able to gain control of Ruta itself.
Your goal is to look at each of the dungeon’s five terminals, represented as glowing orange dots. To do so, exploit one of the Divine Beast’s key features: they are articulated machines that you can partially control. In Ruta’s case, you can freely move the elephant’s trunk. Increments by which you can change the trunk’s angle are represented with purple icons. Select one with the Left stick and A, then execute the command with B.
Note: It’s only by pressing B that the trunk will actually move. It takes a few seconds for the Divine Beast to react.
First terminal: Return to the first room where you eliminated the two eyeballs. Grab the cogwheel’s handle with Magnesis. Rotate it clockwise until the terminal emerges fully out of the water. Then walk over and activate it.
Second terminal: If you look inside the rotating watermill, you can see that it has a terminal you can’t get to because of the pool at the base. Wait until the terminal is at the bottom of the wheel, then use Cryonis to create a block of ice that obstructs the fountain’s water flow. (Note: Aim at the top of the shaft where the water is flowing out, not in the pool below) This stops the watermill and drains the pool so that you can access the terminal.
Third terminal: This is behind a barred gate that is unlocked temporarily when the nearby orb moves into the concave slot. Go into the map and raise the trunk to about ¾ height. It’ll pour water into the room rotating the gear counterclockwise. If the trunk is in full height, it rotates clockwise. As the gear rotates counterclockwise, Stasis on the orb just before it slides downwards, when it is to your left. This lets you wait for the terminal to pass right in front of you with the gate still raised. Examine the terminal and the gate will stay open permanently.
Fourth terminal: After returning to the top of the waterfall, head through the corridor beyond and move the trunk to the lowest position. When it stops moving, glide to the small platform on its tip. From there, open the map menu and move the trunk to the fourth increment from the top. As the command executes, readjust Link’s position to remain at the top of the structure. Once the trunk stops moving, you’ll end up in front of the fourth terminal.
Fifth terminal: Glide to the platform on your left, then glide to the nearby central platform, which is the top of the Divine Beast’s head. Drop down through the small hole in the middle. Land on a semi-circular ledge and eliminate the eyeball, evaporating the Malice goo. Grab the handle nearby with Magnesis and rotate it clockwise until the ceiling hatch is fully open. Open your map menu and move the trunk until the water pours in through the ceiling. This causes the flow of water to extinguish the flames around the terminal below. Drop down and examine it.
Main control unit: Glide back to the entrance. The main control unit is opposite the waterfall in the only room you haven't explored. Interacting with it triggers a boss battle, so be prepared.
Boss Tips And Tricks: Waterblight Ganon
Waterblight Ganon has two phases. The second starts when Waterblight Ganon’s health drops below 50%. Here’s some hints, tips and tricks for how to take this malevolent creature down.
Phase One:
This boss performs melee attacks with its spear, which can reach you over very long distances, so be ready to dodge or perfect-guard at all times.
Standing very far means it’ll throw its spear, which you can tell it will do when it pulls its arm back. Avoid with a side hop or by sprinting perpendicular to the spear’s angle.
Over medium distances, Waterblight Ganon launches a sweeping attack which you can see coming when its arm moves far to the side. Counter by perfect-dodging the blow, backflipping a fraction of a second before the blade hits you. This lets you unleash a flurry rush. A spear-type weapon will really help here.
In melee range, Waterblight Ganon performs a thrust attack. When it moves its arm to its hip, get ready to side-hop with perfect-dodge timing requirements so you can follow up with a flurry rush.
At super close range, Waterblight Ganon plants its spear in the ground to cause a blue shockwave that’s tough to avoid. Sprint away.
After significant amounts of damage, this boss will occasionally collapse. (Drama king!) Rush to it and use combos with your most powerful weapons.
Phase Two
Waterblight Ganon switches to ranged attacks here. The combat arena is also modified and becomes four square platforms surrounded by water.
The boss starts off by flinging an ice block your way, so have Cryonis ready in order to shatter this block before it reaches you.
Deal damage with arrows, aiming at its blue eye to reduce its health more rapidly. If you run out of ammo, you can try remote bombs, but they are less powerful and their range is not as great.
You can also try swimming to its position and hitting it with physical attacks. But swimming is slow and the platforms are so small that this isn’t always practical. Hitting it with physical attacks works better with ranged weapons like spears, since short blades will often fail to hit the target. Arrows are much more reliable though. Did you stock up?
Whenever Waterblight Ganon warps to a new platform it repeats its loop, but the lower its health, the more ice blocks it’ll throw. Have Cryonis ready and sweep the screen so you can destroy all projectiles. If this is a problem, try diving in the water and sheltering behind a platform.
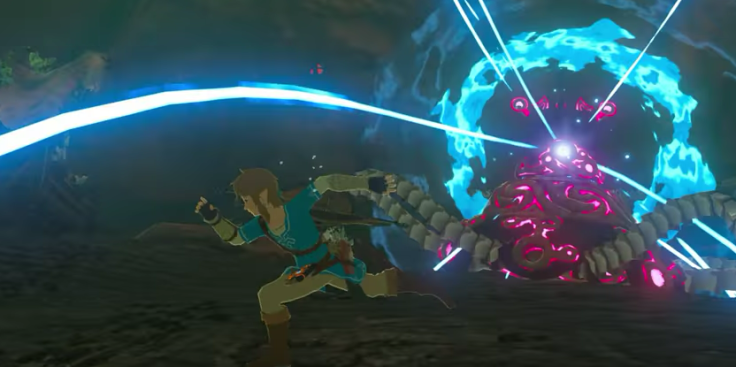
From time to time, Waterblight Ganon will target you with a red laser beam just like Guardians. After charging, the beam will reach full power and is fired at you. The only real counter is to perfect-guard the beam just as it’s about to hit you. This deflects the laser beam to the boss, causing significant damage and incapacitating it for a moment. As you are usually close to it at this point, you don’t have much time to react. You must execute your parry right as the beam is about to be unleashed.
When the boss falls, collect the last heart container. This will also be your last chance to open any treasure chests, since you won’t be able to return after you leave.
Outside you get Mipha’s Grace, a restorative power that resurrects Link with full health plus five temporary bonus hearts when he is critically damaged. While handy, every activation of this power is followed by a long cooldown. You can also collect a Lightscale Trident from the nearby chest after chatting with King Doerephan in the throne room. Now you’re ready for the next quest line!
Do you have any more tips and tricks for solving the five terminal puzzles of the Ruta dungeon or defeating Waterblight Ganon? Feel free to let us know in the comments section below. And before you leave, don’t forget to check out the following guides:
Review: Expansive World, Epic Story Makes This A Must-Own
Beginner’s Guide: Everything You Need To Know To Survive In Hyrule
Recipe And Cooking Guide: Here's All The Ingredient Effects, Ranks And Tips You Need
Battle Guide: Tips On How To Take Down Your Enemies
Horse Guide: How To Tame And Ride Horses And Other Animals
Easter Eggs And Secrets: 18 Things You'd Probably Miss If We Didn't Tell You
Breath Of The Wild Amiibo: Here's Every Function For Every Figure
Thunderblight Ganon Boss Battle: Tips And Strategy To Defeat Vah Naboris Dungeon
Six Gifts For 'Zelda' Fans Under $25
Beginner Item Guide: Here's The Stuff You Shouldn't Sell
Master Sword: Where To Find Link’s Greatest Weapon
Heart Containers Guide: How And Where To Upgrade Your Health And Stamina
Memory Map: All Locations For Link's Lost Memories
Great Fairy Locations: Armor Upgrades And Where To Find Them
Nintendo Switch Tips: Read This Before You Start A New Save
Armor Guide: Where To Find New Outfits, Clothes And Upgrades
Camera Guide: Tips To Use The Camera Like A Pro
Blood Moon Explained: Cooking Bonus, Enemy Respawns And More
Nintendo Switch Scratched Screens Caused By Dock: How To Protect Your Console
Weapon Numbers Explained: Attack Power, Not Durability Listed In Inventory
Korok Seed Locations: Where To Find Hestu And How To Solve Puzzles For All 900
Unlimited Stamina Glitch: Find Out How To Run Fast Without Tiring [VIDEO]
Elemental Weapon Tips: Why Fire, Ice & Lightning Are Must-Haves For Your Arsenal


