If you’re looking for solutions to Breath of the Wild’s Divine Beast Vah Naboris terminal puzzles, welcome! We have the solutions for all five terminal puzzles in the Divine Beast Vah Naboris dungeon as well as tips, tricks and strategy for Naboris’ boss fight against Thunderblight Ganon. So if you need a walkthrough for the Naboris dungeon, check out our Van Naboris terminal walkthrough in our Legend of Zelda: Breath of the Wild guide below.
The first thing you need is the map terminal , which you can find to the opposite side of the main room by climbing up the ramp to your right. Your map has orange dots for terminals and purple pins to indicate the three circular sections of the main room that can be rotated by 90 degrees. The ring nearest the beast’s head is the front ring , the ring by the beast’s tail is the rear ring and the one in the middle is the middle ring.
First terminal: Rotate the front ring three times. When it stops, step on the walkway to your right when facing the Divine Beast’s head. From that position, rotate the front ring one more time. The walkway will go from vertical to horizontal again and you’ll end up with the first terminal a short way in front of you. Sprint and leap over to activate it.
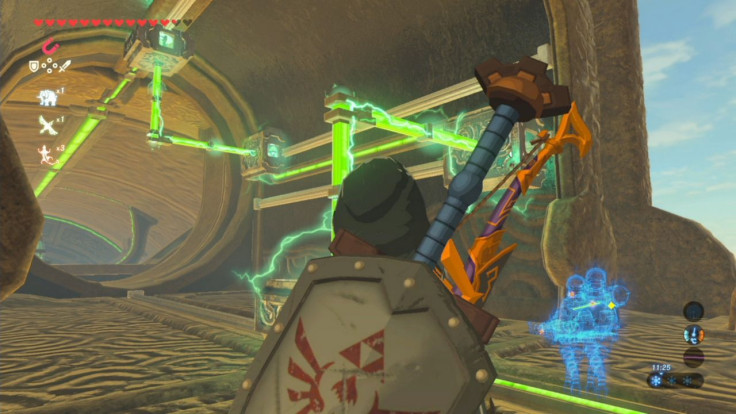
Second terminal: Head to the rear of the Divine Beast and rotate all three discs so that their power cables are aligned atop the structure. The cables are represented in the map as a colored line segment that is green when the cable is in its top position and orange when not. This triggers the rotation of a vertical disc next to the front ring. Head inside either opening on the rotating disc, and once you’re at the top, you’ll have access to an exit that overlooks the DIvine Beast’s neck.
Drop down to the platform with the cross-shaped lever. Clockwise triggers the rotation of a small disc on the left; counterclockwise rotates the small disc on the right. Each disc has an electrode. You must have both electrodes at the top of their respective discs aligned with the power cables on the floor. Do the electrodes one at a time, pushing the lever slowly in one direction until the first electrode is active, then the other with the lever in the opposite direction. This raises the DIvine Beast’s neck and activates an elevator platform.
Step on the elevator and ride it all the way to the top, where you’ll find the second terminal.
Third terminal :
Head back to the main room. From the top of the rotating disc, drop down to the long ledge running across the disc when its longer side is on the right of the Divine Beast (when facing its front). Jump to the nearby walkway from the edge. Sprint and leap to the central platform with the green crystal. Keep going until you reach the shaft at the other end of the main room.
Adjust the sliding power connectors using Magnesis so that there is one pair at each end of the sliders, causing the tail of the Divine Beast to move up. Then rotate any of the three ring sin the main room and cut the power. The tail will move back to its original position. Head to the back of the pillar at the top of the tail, close to an electrode, then reposition the ring you just rotated to restore power. The tail will move up once more, and this time you will be on top of the pillar, which will now be a bridge. Now you have access to the back hump of the Divine Beast. You must move close to the glowing eyeball blocking your path here before you can shoot it.
So shoot the eyeball inside the hump, then climb the ladder to reach the ledge above the door you just came through. Rotate the cross-shaped lever until the power is feeding the electrode, which will activate a sliding platform that takes you to the other hump.
The ledge halfway between the two floors without a treasure chest features an electric orb instead. Cast Stasis on the elevator when the orb is within reach and pull it towards you with Magnesis. Now drop it to the lower floor, where you will be using it again in a bit.
Ride the elevator back to the top, using the sliding platform to reach the Divine Beast’s other hump. Kill the Guardian Scout, then hit the glowing eyeball just beneath the platform with an arrow. The third terminal was trapped in Malice goo, but now it’s free and you can activate it. Take the elevator to the top floor.
Fourth terminal: Pick up the second electric orb, carry it to the elevator and ride to the bottom floor. Shoot the glowing eye in the corner with an arrow, then left the electric orb with Magnesis and put it into contact with the electrode above the sealed gate. Now the gate will open. Deal with the Guardian Scouts by using an ancient weapon, then pick up the electric orb and drop it on one of the two small pedestals in front of the big barred gate. Grab the first electric orb in the adjacent room and drop it on the second pedestal to raise the gate and give you access to the fourth terminal.
Fifth terminal: Return to the elevator room that belongs to the rear hump, but exit the room rather than riding the elevator. Jump to your left (when facing the beast’s head, this is the right side) and glide around the right hind leg. You want to land on the platform between its two right legs.
Walk into the right hind leg’s structure and step inside the cube-shaped room. The fifth terminal is on the wall in front of you but is inaccessible. By rotating the rear ring once, the terminal will be in the correct position for you to activate. Then rotate the rear ring three times so that you can leave this room.
Main control unit: Move to left (when facing the Divine Beast’s head) of the front ring and climb u p the walkway. You’ll see two round opening blocked by destructible rocks on both sides. Throw a bomb at the opening on the left (when facing the head). Eliminate a Guardian Scout, then follow the walkway towards the Beast’s tail. You’ll wind up in a small room inside the hind leg with a treasure chest. Open your map and rotate the middle ring twice to align the main control unit so that you can examine it, which will trigger the boss fight.
For tips, tricks and best strategy to defeat Thunderblight Ganon, the Divine Beast Vah Naboris dungeon boss, check out our in-depth guide here.
Need more information about The Legend of Zelda: Breath of the Wild? Check out our in-depth series of guides below:
Can’t get enough Breath of the Wild ? Check out more of our articles and guides about the game.
Review: Expansive World, Epic Story Makes This A Must-Own
Breath Of The Wild Amiibo: Here's Every Function For Every Figure
‘Breath Of The Wild’ Changed How I See The World
Six Gifts For 'Zelda' Fans Under $25
Nintendo Switch Scratched Screens Caused By Dock: How To Protect Your Console
Nintendo Switch Tips: Read This Before You Start A New Save
Beginner’s Guides:
Beginner’s Guide: Everything You Need To Know To Survive In Hyrule
Beginner Item Guide: Here's The Stuff You Shouldn't Sell
How To Start A Fire In 'Breath Of The Wild': Tips And Tricks For Keeping Link Warm
Recipe And Cooking Guide: Here's All The Ingredient Effects, Ranks And Tips You Need
Blood Moon Explained: Cooking Bonus, Enemy Respawns And More
Battle Guide: Tips On How To Take Down Your Enemies
Horse Guide: How To Tame And Ride Horses And Other Animals
Camera Guide: Tips To Use The Camera Like A Pro
Dungeon & Side Quest Guides:
Ruta Walkthrough: Solutions For All Five Terminals And Boss Hints, Too
Vah Medoh Walkthrough: How To Solve All Terminal Puzzles And Beat Windblight Ganon Boss
Thunderblight Ganon Boss Battle: Tips And Strategy To Defeat Vah Naboris Dungeon
Ceremonial Trident: How To Complete 'Ceremonial Song' Sidequest And Unlock Dagah Keek Shrine
Hylian Homeowner Sidequest: Tips To Buy The House In Hateno Village
Weapons & Armor Guides:
Master Sword: Where To Find Link’s Greatest Weapon
Great Fairy Locations: Armor Upgrades And Where To Find Them
Armor Guide: Where To Find New Outfits, Clothes And Upgrades
Climbing Gear: How To Find The Armor, Bandana And Boots To Improve Climbing
Weapon Numbers Explained: Attack Power, Not Durability Listed In Inventory
Elemental Weapon Tips: Why Fire, Ice & Lightning Are Must-Haves For Your Arsenal
Collectible Guides:
Memory Map: All Locations For Link's Lost Memories
Korok Seed Locations: Where To Find Hestu And How To Solve Puzzles For All 900
Luminous Stone: What They're For, When You Need Them And Why You Shouldn't Sell Them
Heart Containers Guide: How And Where To Upgrade Your Health And Stamina
Easter Eggs And Secrets: 18 Things You'd Probably Miss If We Didn't Tell You
'Breath Of The Wild' Easter Egg: A Hidden Message Is Revealed From Game's Fantasy Sheikah Language
Glitches & Tricks Guides:
Unlimited Stamina Glitch: Find Out How To Run Fast Without Tiring [VIDEO]
Rupee Trick: Get 700 Rupees Every 3 Minutes, Shares Redditor
Rupee Farming: How To Gamble, Cook And Gather Your Way To Riches
Enemy Guides:
Ending Guide: How To Beat The Final Boss (No Spoilers)
Molduga Guide: How To Find And Defeat This Tremor Worm Before It Kills You
Guardians: How To Defeat And Farm Material To Get Killer Armor And Weapons
‘Breath Of The Wild’ Dragons: Locations And Their Purpose In The Game
Molduga Guide: How To Find And Defeat This Tremor Worm Before It Kills You
Stone Talus Guide: How To Beat This Enemy Sub-Boss And All Its Variants